Adding or Changing Agency Settings
- IT Info
- Kavita Pillai
- Former user (Deleted)
This topic describes the options and settings on the Agency Settings page.
Overview
When a site is cloned from a template, agency configuration settings are cloned too. Most settings can remain the same, but some may need to be adjusted depending on the individual site’s requirements. Agency information includes the agency’s pseudo-city code (PCC), pricing codes, and other agency-specific settings.
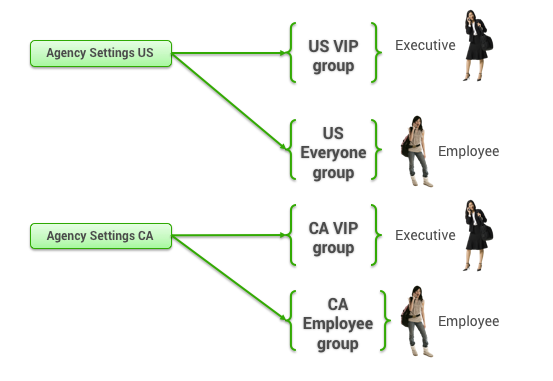
In order to have different agency settings for different groups of users, you create or edit an agency configuration setting for each group. You can also assign an agency setting to multiple groups. For example, if your Canadian settings differ from your US settings, and you have two groups for CA and US, you can assign the CA settings to both CA groups, and the US setting to both US groups.
Tip: For a description of groups, see Groups Tab for Managing Groups.
Navigating to the Agency Settings Page
To go directly to the Agency Settings page, follow these steps:
- Click the Services tab.
- Click the Travel Agency link inside the Travel section.
- Click the Agency Settings link. The Agency Settings page appears.
On the Agency Settings page, choose one of the following:
- To add a new configuration setting, click Add A New Agency Setting. The Add Agency Setting page appears, showing the sections below (starting with "Agency Configuration Settings").
- To view or edit an existing set, click the name link in the Setting Name column. The Edit Agency Setting page appears, showing the sections below (starting with "Agency Configuration Settings").
Tip: You can also add or change agency configurations by choosing a specific group's set first. To view and change the agency configuration for a group, click the Add/Edit Agency Config Sets link on the Rules page for the group (as described in Enabling Travel Rules). The Agency Settings page appears.
Agency Configuration Settings
Each setting requires a setting name. Enter the name of the agency configuration in the Setting Name field at the top. This name should be easily recognizable as a specific agency configuration. An example is "Sabre Config" to show that this one uses the Sabre global distribution system (GDS). Other examples of the need for additional agency configurations are different passenger name record (PNR) edits, different pseudo-city codes, or different queue delivery options.
Entering the Host Information
- GDS (required): Choose the global distribution system from the dropdown menu.
- TA Groups (required): This is the Terminal Address. Choose ExternalSabreNew for Sabre, ExternalApollo for Apollo, ExternalGalileo for Galileo or ExternalWorldspan for Worldspan from the dropdown menu.
- Pseudo-City Code (required): Enter the agency’s pseudo-city code.
- Default Queue (required): Enter the queue to use as a default. This queue can be changed for more specific queue delivery. Use the appropriate format for referring to a queue based on the GDS you are using.
- Sales Location (required): Enter the airport code associated with the agency’s pseudo-city used for obtaining fares.
Note: If you are enabling Canada's VIARail train service, the airport code entered into the Sales location field determines whether Amtrak or VIARail is made available to the traveler. If a US airport code is entered, then it is US’s Amtrak train service that will be offered. If a Canadian airport code is entered in the Sales Location field, then it is Canada's VIARail train service that will be offered. Because there is only one sales location field allowing only one code, to enable both Amtrak and VIARail on the same site, 2 agency settings pages must be configured.
Entering Ticketing Information
- Ticketing TA Group: This is used only if you chose Yes for the "Automatically void tickets when an itinerary is cancelled" option as part of the display configuration. See Booking, Change and Cancellation Configuration for details about this option.
- Ticket Printer Address: Required if you chose Yes for the "Automatically void tickets when an itinerary is cancelled" option as part of the display configuration. See Booking, Change and Cancellation Configuration for details about this option.
- Itinerary/Invoice Printer Address: Required if you chose Yes for the "Automatically void tickets when an itinerary is cancelled" option as part of the display configuration. See Booking, Change and Cancellation Configuration for details about this option.
- Hardcopy Printer Address: Required if you chose Yes for the "Automatically void tickets when an itinerary is cancelled" option as part of the display configuration. See Booking, Change and Cancellation Configuration for details about this option.
Adding Ancillary Sources
If ancillary sources have been configured for your site by Deem, they appear within the Ancillary Sources section. You can click the link in the Source Name column to view or change settings on the Edit Ancillary Source page, or click Remove for an ancillary source to remove it. To add an ancillary source, click Add Ancillary Source.
Note: See Ancillary Sources of Travel Search Results for an overview of the sources of flight and train information.
Agency Information
- Scroll down to Agency Information, and fill out the information:
- Agency Name: (Required) Enter the agency name. Be careful to not exceed 30 characters. This will display in Deem confirmation emails and is displayed on the Trip Confirmation page
- ARC Number: (Required) Enter the agency ARC number.
- Hotel ARC Number: Enter the agency hotel ARC number.
- Rental Car ARC Number: Enter the agency rental car ARC number.
- IATA Number: (Required) Enter the agency IATA number. The IATA number should not include letters or special characters.
- Country: Enter the agency country.
- Street Address: Enter the agency street address.
- Apartment / Suite: Enter the agency apartment or suite number.
- City: Enter the agency city.
- State: Enter the agency state.
- Zip code: Enter the agency zip code.
- Time Zone: (Required) Enter the agency time zone used for ticketing cancelation.
- Agency Name: (Required) Enter the agency name. Be careful to not exceed 30 characters. This will display in Deem confirmation emails and is displayed on the Trip Confirmation page
- Enter the Agency Contact information:
- Name: (Required) Enter the contact name. This information is used by Deem for reference only.
- Title: (Required) Enter the contact title. This information is used by Deem for reference only.
- Phone: (Required) Enter the contact phone number. This phone number will appear on the Trip Confirmation page and print on the trip itinerary.
- Toll-Free Phone: Enter the contact toll free phone number. This information is used by Deem for reference only.
- Email: (Required) Enter the contact email address. This information is used by Deem for reference only.
- Message to Users (Optional): Enter a message to display to users on the Purchase, Confirmation, and Trip Detail pages, on the e-Receipt, and on trip notifications and calendar entries. Do not use HTML tags or travel lingo.
- Enable confirmation notifications from site name: Click this checkbox to enable email confirmations to be sent from this site.
- Domestic Definition: Select the countries that define domestic travel for this agency, and click Add to move them to the Selected Countries box.

These countries are governed by domestic travel requirements. All others are considered international.

Passenger Name Record (PNR) Configuration
The passenger name record (PNR) configuration governs how PNRs are synchronized with the global distribution system (GDS).
Note: Changing these settings requires knowledge of PNR scripting for the specific GDS you are using. See Global Distribution System for an introduction. If you need to customize the PNR, see Customizing the Passenger Name Record.
Follow these steps:
- Booking Configuration: Select a PNR edit configuration from the dropdown menu for this agency. This identifies what PNR edit sets to use for this agency configuration. See Customizing the Passenger Name Record for details on creating an edit configuration.
- PNR Synchronization Settings: Click the Add Synchronization Settings link to add the GDS for synchronization. The Services | Add PNR Synchronization page appears.
- Acquire off-line PNRs: Select the checkbox to acquire off-line PNRs.
Note: When synching an offline PNR, the unique identifier is the only element that Deem looks for to synch to a travelers account. - Select a GDS: Choose a GDS from the dropdown menu.
- TA Group: Select ExternalSabreNew for Sabre, ExternalApollo for Apollo, ExternalGalileo for Galileo, or ExternalWorldspan for Worldspan.
- Acquisition Queues:
- Enter the Pseudo-city where PNRs are to be acquired: Enter the pseudo-city code.
- Enter the queue where off-line PNRs are placed for acquisition: Enter the first queue to use for off-line PNRs.
- Enter the Pseudo-city where PNRs are to be processed if different from above: Enter the pseudo-city code to use for processing if different from acquisition pseudo-city.
- Enter the first queue where off-line PNRs are to be processed: Enter the first queue to use for off-line PNR processing.
- Enter the second queue where off-line PNRs are to be processed: Enter the second queue to use for off-line PNR processing.
- Acquisition Failure Queue:
- Enter the pseudo-city for the queue where PNR’s that fail acquisition are placed, if different from the acquisition pseudo-city: Enter the pseudo-city to use for failed synch requests.
- Enter the queue (with queue action if appropriate) where off-line PNRs that fail acquisition are placed: Enter the queue to use for failed synch requests.
Note: It is the responsibility of the agency to monitor failed acquisitions.
If there is no failure queue configured, the PNR is removed from the queue. If a failure queue is configured, the PNR will be placed on that queue, but no documentation is added.
- Owner Identification:
- Select the method used to look up the owner of a PNR: This is set during implementation and there is no need to change it. It is a best practice to use Unique Identifier.
- Enter prefatory remarks that precede the traveler’s owner identifier in the PNR.
- Hours of Operation: Our scripts run every hour on the half hour. If scripts are to run more or less frequently, or at a different time, configure the timing here:
- Select the hours of operation for this PNR synchronization configuration: Select Always On or Specific Hours and then set the hours of operation.
- Select how frequently PNR synchronization should be attempted: Select the frequency to use for synchronization.
Warning: Each time PNR synchronization is triggered, GDS hits occur can incur charges. We recommend setting the interval to no more than every 60 minutes.
Tip: When an error occurs during PNR synchronization, a passive segment can be created if passive segments are enabled (described in the next section).
Note: If a PNR is in the queue and it does not belong to a Deem user, the PNR is simply removed from the queue (QR) and no additional action is taken.
Passive Segment Processing
A passive segment is a set of trip information entered into the GDS that does not cause a ticket to be issued by the GDS. Passive segments are not used often. Processing a passive segment requires knowledge of JavaScript.
Passive Car Segments are no longer used. For Passive Hotel Segments, follow these steps:
- Enter a JavaScript that will construct the GDS command to sell a passive hotel segment: When passive segments are enabled, JavaScript entered here is used to process the passive segment.
- Enter a JavaScript that will parse the variable portion of a passive hotel segment: If an error occurs during PNR synch due to agency unique requirements, enter JavaScript here that rewrites the script for the PNR to succeed.
For examples of passive segments for train service, see Passive Segment Examples for Train Service.
Travel Settings and Negotiated Rates
Note: Before setting up agency-negotiated airline fares (called "rates" in this section), see Submitting Contracted Fares to Airlines for ATPCO Distribution for an overview of the process of filing the contracted fares with ATPCO for distribution to both the booking GDS and ITA.
Follow these steps to set up air pricing and agency-negotiated rates:
- Under the Travel Settings heading, enter the default passenger type code for Customer Code to be used for air pricing. If you don't enter a code, the default is ADT (Adult).
- Under the Negotiated Rates heading, enter into the Customer Code field the customer code your agency uses to query for airline negotiated rates in the GDS. This code will be sent to the GDS to retrieve the negotiated rates.
Note: Enter only one customer code into the Customer Code field. Subsequent customer codes must be added to an airline private rate. See Airline Private Rates for instructions. - Enter the ATPCO account codes that are used to query for airline negotiated rates from ITA. This code will be sent to ITA to retrieve the negotiated rates.
Note: You can enter multiple account codes if needed. - Specify the locales associated with the ATPCO account codes:
- Pseudo City Locale: Sales or Home. Sales is typically selected.
- IATA Locale: Sales or Home. Sales is typically selected.
Train Support
To change settings for train support, scroll down to the Train Support section of the Services | Add Agency Setting or Services | Edit Agency Setting page, and follow these steps:
- Channel: Enter the Deem-supplied Channel code (all capital letters). Contact your Deem representative if you did not receive this code.
- Agency Identifier: Enter the Deem-supplied Agency Identifier (all capital letters). Contact your Deem representative if you did not receive this identifier.
- Customer Identifier: Enter the Deem-supplied Customer Identifier (all capital letters). Contact your Deem representative if you did not receive this identifier, which defines a specific customer and is created during implementation. The field is used for reporting only.
- Client ID Number: Enter the number to be used when optional reporting is required.
- Customer DK Number: Enter the number to be used when optional reporting is needed.
- Amtrak Specific Support: Follow these steps:
- Add passive train segment to primary GDS?: Select Yes or No. A passive segment is a set of trip information entered into the GDS that does not cause a ticket to be issued by the GDS. For example, a traveler may be taking a train between cities, and although you do not use the GDS to issue the train ticket, you may want all of the trip information to be in one place for the traveler's benefit, and so that agents can generate itineraries or make notes. By default, no information is saved in the GDS unless you select Yes. For examples of passive segments for train service, see Passive Segment Examples for Train Service.
- Message for Train support procedure and phone numbers: Enter the message to appear to the traveler on the purchase page and on confirmation messages. Do not include HTML tags or travel lingo.
- Train support phone number for mobile client: Enter the phone number to appear in the mobile client if the number is different from other support numbers.
- ATOC (UK) Specific Support: Follow these steps:
- Message for Train support procedure and phone numbers: Enter the message to be displayed to the traveler on the purchase page and on confirmation messages. Do not include HTML tags or travel lingo.
- Train support phone number for mobile client: Enter the phone number to be displayed in the mobile client if the number is different from other support numbers.
Queue/Delivery Options
When a PNR is complete, the record is sent to a queue for processing (ticketing, invoicing, etc.). The PNR can be sent to the default queue set up for the agency configuration, or to a different queue. You may have already defined the queue and delivery options in a set, and you can choose that set in the Options Set dropdown menu under the Queue/Delivery Options heading at the bottom of the Services | Add Agency Setting or Services | Edit Agency Setting page. You can also define a queue for PNRs requiring urgent actioning during the void process
If you haven't defined a set of queue/delivery options, or you need to modify an existing set, see Setting Queue and Delivery Options..
Pre-trip Approval
Pre-trip approval offers an automatic method of controlling travel spending by designating approvers who can approve or deny a user's travel request.
Pre-trip approval audits itineraries that include air, hotel, or car rentals, and sends an email to the user's designated approver (or a secondary approver) for notification. The user can provide a reason for the trip to include in the emails to approvers.
You can also configure the feature to not only send a notification email, but also enable approvers to approve or decline the trip before ticketing occurs by clicking a link in the email. Approvers can click a link in the email to approve or decline the trip on a computer or mobile device. See Setting Up Pre-Trip Approval for a walk-through description of setting it up.
Scroll down to the bottom of the page and follow these steps to enable pre-trip approval:
- Click the Add PTA Configuration link. The Pre-Trip Approval Settings page appears.
- Select the Enable Pre-Trip Approval checkbox to enable the service.
- In the Approved Bookings section, enter the pseudo-city, and the queue for dropping approved PNRs:
Note: If you haven't defined a set of queue/delivery options, or you need to modify an existing set, see Setting Queue and Delivery Options.- Pseudo-city: (Required) Enter the agency’s pseudo-city code.
- Queue: (Required) Best practice is to use the ticketing queue where approved bookings are placed for ticketing.
- In the Declined Bookings section, enter the pseudo-city, and the queue for dropping declined PNRs:
- Pseudo-city: (Required) Enter the agency’s pseudo-city code.
- Queue: (Required) Best practice is to use the queue where declined bookings are placed.
- In the Expired Bookings section, enter the pseudo-city, and the queue for dropping expired PNRs:
- Pseudo-city: (Required) Enter the agency’s pseudo-city code.
- Queue: (Required) Best practice is to use the queue where expired bookings are placed.
Note: Remember to manually cancel any expired trips. Although the air ticket is not issued, the trip is not auto-cancelled and could incur hotel penalties.
- Choose the following time windows after booking for sending the notification emails:
- Time window after booking for pre-trip approval prior to sending email to secondary approver: Choose the number of hours from the dropdown menu that it should take for the primary approver to approve or decline the trip. After this time, an email is sent to the secondary approver if the itinerary has not be approved or declined by the primary approver.
Tip: Best practice is to set this window to 4 – 6 hours to provide enough time for the alternate approver before the 24-hour void window. - Time window after booking for pre-trip approval prior to sending to the expired queue: Choose the number of hours from the dropdown menu that it should take for either approver to approve or decline the trip. After this time, the itinerary will be sent to the expired queue.
Tip: Best practice is to set this window to 24 hours to provide enough time for the alternate approver before the 24-hour void window.
- Time window after booking for pre-trip approval prior to sending email to secondary approver: Choose the number of hours from the dropdown menu that it should take for the primary approver to approve or decline the trip. After this time, an email is sent to the secondary approver if the itinerary has not be approved or declined by the primary approver.
Saving the Agency Settings
If you are finished with agency settings, click Save at the bottom of the page.
After saving agency settings, you can assign an agency setting to each group. See Enabling Travel Rules for instructions.
Note: To commit all of your changes, click the changes not applied link at the top of the page. The Commit Changes page appears. Click the Commit button.