Setting Queue and Delivery Options
- IT Info
- Kavita Pillai
- Former user (Deleted)
The Queue/Delivery page lets you set up conditions which must be met in order for a passenger name record (PNR) to be placed in a particular queue. You can create a queue/delivery option to define these conditions for a queue.
Lists and Sets
The List and Set structure is used throughout the Deem Dashboard.
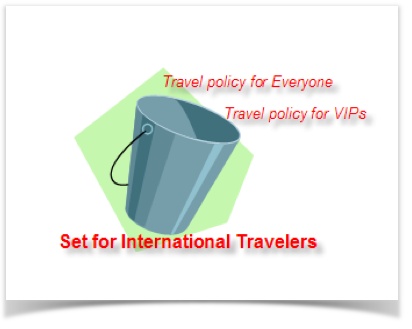
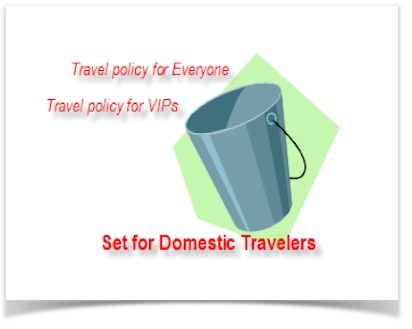
Using travel policy as an example, a List could be the policy set up for the general population of travelers. A second list could be the policy set up for VIP travelers and so on.
A Set is a holder, or a “bucket”, into which related lists can be placed. Continuing with the travel policy example, the two lists mentioned (general population travelers and VIP travelers) could be placed in a Set titled Domestic Travelers. If travel policies were then created for internationally based travelers, a set could be created to hold those lists.
Once details have been defined (the list), add them to the holder (set) for use when configuring travel policy. In the dashboard a link for Lists and Sets will be seen under many of the Services functions.
Adding or Changing a Queue/Delivery Option
To add a queue/delivery option, follow these steps:
- After clicking the Services tab, click the Travel Agency link. The Services | Agency Configuration page appears.
- Click the Queue/Delivery Options link. The Services | Queue/Delivery Options page appears.
- Click the Queue/Delivery Options link on the Services | Queue/Delivery Options page. The Services | Queue / Delivery Options page appears with a list of option settings.
- Click the name link for the option settings to be changed, or click the Add a New Queue/Delivery Option link to add a new setting. The Services | Edit Queue/Delivery Options or Services | Add Queue/Delivery Options page appears:
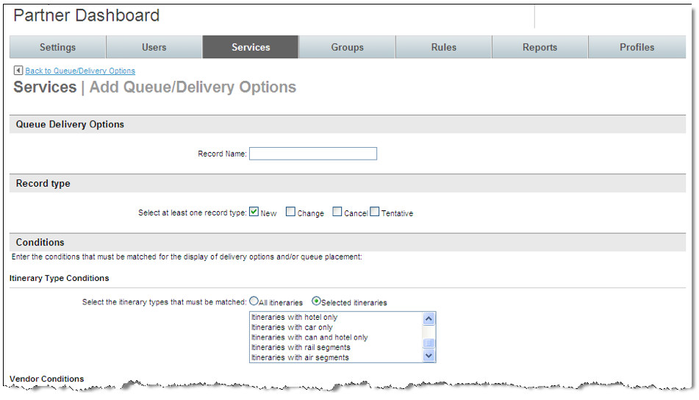
- Enter a name in the Record name field for the option settings, and select either New, Change, Cancel, or Tentative as the Record type. Choosing New creates a new setting.
Entering the Conditions
In the Conditions section of the page, enter the conditions that must be matched in order to show delivery options or queue placement. Conditions can be based on the itinerary type or vendor. For example:
- Select an itinerary, and enter airport and train station codes in the Departure Conditions section. You can also select one or more US states or countries used for departure.
- You can also set similar conditions in the Return Conditions section.
Itinerary Type Conditions
Follow these steps:
- Click the radio button for All itineraries or Selected itineraries.
- If you choose Selected itineraries, select one or more itinerary guidelines, such as Itineraries with at least one international segment, from the selection box (hold down your CTRL key to select more than one).
- All conditions must be met for this queue/delivery option.
** PLEASE NOTE: Below is a sample script you may use to invoke a queue drop off for a multi-city booking.
//Multi Destination
var md=UserPnrData.TravelType;
if (md=="MultiDest") {out.print("true");}
else {out.print("false");}
Vendor Conditions
Follow these steps:
- Click the radio button for Any airlines or Selected airlines for the "Which airlines must be included in the itinerary" condition. If you choose Selected airlines, follow these steps:
- Select one or more airlines from the selection box (hold down your CTRL key to select more than one).
- Choose how the airline participates in the itineraries (such as One selected airline must be included on all legs) from the "How must these airlines participate in the itineraries" dropdown menu.
- Airline supports e-tickets: Click the radio button for Yes, No, or Not Applicable.
- Web fare was booked by third party provider (TRAVELfusion): Click the radio button for Yes, No, or Not Applicable.
- Select one or more matching airline class of service: Select one or more service classes from the selection box (hold down your CTRL key to select more than one).
- Select one or more car companies that must be included in the itinerary: Select one or more car rental companies from the selection box (hold down your CTRL key to select more than one).
- Select one or more hotel chains that must be included in the itinerary: Select one or more hotel chains from the selection box (hold down your CTRL key to select more than one).
Date/Time Conditions
Follow these steps:
- Choose a ticketing deadline, such as Tomorrow, from the "Select a ticketing deadline" dropdown menu.
- Select the booking date/time range that should be used for itinerary evaluation: Choose start and end dates from the dropdown menus.
- Select the airline flight departure, train departure, hotel check-in or rental car pickup date/time range that should be used for itinerary evaluation: Choose start and end dates from the dropdown menus.
- Select the time range that the booking date must match that is prior to flight departure, train departure, hotel check-in or rental car pick-up: Choose start and end (such as Any Time or 1 hour) from the dropdown menus.
Departure Conditions
Follow these steps:
- Enter one or more comma separated airport codes from which the itinerary must depart to be used for evaluation: Enter one or more airport codes separated by commas. (You can click the Airport Code link to find airport codes for cities.)
- Enter one or more comma separated train station codes from which the itinerary must depart to be used for evaluation: Enter one or more train station codes separated by commas. (You can click the Station Code link to find train station codes for cities.)
- Select one or more US states from which the itinerary must depart to be used for evaluation: Select one or more states from the selection box (hold down your CTRL key to select more than one).
- Select one or more countries from which the itinerary must depart to be used for evaluation: Select one or more countries from the selection box (hold down your CTRL key to select more than one).
Return Conditions
Follow these steps:
- Enter one or more comma separated airport codes from which the itinerary must return to be used for evaluation: Enter one or more airport codes separated by commas. (You can click the Airport Code link to find airport codes for cities.)
- Enter one or more comma separated train station codes from which the itinerary must return to be used for evaluation: Enter one or more train station codes separated by commas. (You can click the Station Code link to find train station codes for cities.)
- Select one or more US states from which the itinerary must return to be used for evaluation: Select one or more states from the selection box (hold down your CTRL key to select more than one).
- Select one or more countries from which the itinerary must return to be used for evaluation: Select one or more countries from the selection box (hold down your CTRL key to select more than one).
Other Conditions
Follow these steps:
- Does the matching itinerary contain a ticket with any refundable value: Click the radio button for Yes, No, or Not Applicable.
- Is an unused ticket being recommended for exchange: Click the radio button for Yes, No, or Not Applicable.
- If a ticket is being voided: Click the radio button for Yes, No, or Not Applicable.
- Does the matching itinerary contain Special Handling Instructions: Click the radio button for Yes, No, or Not Applicable.
- Does the record contain multiple passengers: Click the radio button for Yes, No, or Not Applicable.
- Enter the GDS price variance that must be exceeded for matching itineraries: this setting is no longer used
- Create a custom script: Enter a custom script to define the requirement for this queue. Deem can help with this — enter a support case for help (see Entering a Support Case for instructions).
Setting the Actions
Set actions to take place if all the above conditions are met. Follow these steps:
- Allow matches to other records: Click the radio button for Yes or No.
- Enter the PCC (Pseudo City Code) and Queue where the matched booking record should be placed: Enter the Pseudo City Code and Queue identifier.
- Place matched booking records on both the assigned and default PCC/Queue: Click the radio button for Yes or No. The default queue is the queue assigned on the Agency Settings page (see Adding or Changing Agency Settings for details).
- Enter the delivery option(s) that should be displayed to traveler on the Trip Purchase page if the itinerary matches: Enter text. Don't use HTML tags.
- Show delivery address information with above delivery options: Click the radio button for Yes or No. You may need to show a delivery address for a paper ticket.
Saving and Adding to a Set
- Click the Save button at the bottom of the page to save your changes.
- Click the Back to Queue/Delivery Options link to return to the Services | Queue/Delivery Options page.
- Click the Queue/Delivery Options Sets link to add the Queue Delivery List item to a set. The Services | Queue/Delivery Option Sets page appears.
- Click the set name link for an existing set, or click the Add a New Queue/Delivery Options Set link to add a new set. The Services | Add Queue/Delivery Option Sets page appears.
- Enter a name in the Set Name field, and click the Add Option link to add list items to the set. The Services | Search & Add Queue/Delivery Options page appears.
- Click the radio button beside the list to select it, and click the OK button to add just this one list to the set, or click the OK & Add Another button to add other lists to the set.
- When you have completed your selection, click the Save button.
Note: To commit all of your changes after saving them, click the changes not applied link at the top of the page. The Commit Changes page appears. Click the Commit button.