Overview
The sites you manage are created from templates, which were set up with Deem to implement the features you want. As a site administrator or reseller of the Deem solution, your organization performs the following key functions:
- Defining rules for groups, based on the template's policies and configurations
- Setting or changing policies, configurations, and service options
- Managing and supporting site users and responding to problems
- Creating and administering sites, and configuring settings, administrators, and reports
- Uploading and syncing user profiles and other data
Tip: Our training sessions are organized according to these functions.
This overview session covers the first function: defining rules for groups, based on the template's policies and configurations.
Note: The second session, Setting Travel Policies and Configurations, shows you how to access settings, configurations, and policy choices in order to make changes.
How Sites are Organized
The Partner Dashboard offers two levels of control: the super domain level and the domain (a.k.a. site) level.

- Super-domain level: This level provides configurations and controls that govern all sites (domains) within the super-domain, and provides the following tabs:
- Sites tab for choosing a site, adding a site, editing domain (site) and company details, and viewing user adoption statistics.
- Administrators tab for adding and managing administrators.
- Groups tab for setting up collections of sites.
- Configuration tab for setting up configurations for multiple sites at once.
- Site (domain) level: The site level of the Partner Dashboard manages all of a single site's services and configurations, and provides the following tabs:
Your role defines which level you can log into, and which tabs you see.
Super-Domain Administrator View
When you log in as a super-domain administrator (and as some other super-domain roles), you see the super domain level and all of its tabs. You have access to both levels and all tabs.

As a super-domain administrator, you can:
- Create sites
- Create other roles that provide access to one or both levels and one or more tabs.
- Choose a site to see the domain (site) level.
Note: You can refer to Setting Up Partner Dashboard Administrators for a description of each role. We cover this topic in another session: Administering Multiple Sites and Reports.
Choosing a Site in the Super Domain
As a super-domain administrator or other role that has super-domain access, you can choose a site that has already been created.
Click the Sites tab if it is not already selected. A list of sites (domains) appears:

Tip: You can click the link in the Site ID column to see site statistics about user adoption.
Note: We describe the Name and Groups links in another session: Administering Multiple Sites and Reports.
Click the Settings link to open the domain-level Partner Dashboard. The Settings, Users, Services, Groups, Rules, Reports, and Profiles tabs appear. You may not see all these tabs, depending on the roles assigned to you by the super-domain administrator.
Site (Domain) Administrator View
When you log in as a site administrator, you see only the site (domain) level and its tabs. You would never see the super domain level.

Using the Online Training and Reference Guide
To find all training and reference content about the Partner Dashboard, click Help in the top right corner of the page, next to the Sign out tab.

A new window appears in your browser. To show the window's toolbar and use the browser's "back" button, choose to view the toolbar:
- In Safari, choose View > Show Toolbar. The back-arrow button takes you back one page.
- In Chrome, choose History > Back to go back one page.
Note: If you don't have the Partner Dashboard open, enter admin.deem.com in your browser's address bar.
Tip: You can enter admin.deem.com in the browser of a mobile device, such as an iPhone or iPad.
Here are some tips for using our Resources pages:
- Use the navigation tree in the left column of the page to navigate directly to pages. Click the expand icon for a "parent" page to see all of its "child" pages. Click the page title to go directly to that page.
- To zoom into the image, click the image, and click the magnifying glass icon to zoom in; click the X in the upper right corner to go back to the page.
- Use the ... menu in the upper right corner to choose Link to This Page, Export to PDF, and Export to Word.
- Click a PowerPoint slide's download icon (in the lower left corner of the slide) to download a presentation. You can also choose Attachments from the ... menu in the upper right corner to download all attached images and files, including presentations.
Site users, such as employees of your customer or client, can access a user's guide and instructional videos about the user experience by clicking the Help link in the profile name dropdown menu in the top right corner of the service page (such as the Travel page) or the Home page. If you don't have the Deem service open in your browser, see User Help for instructional videos and a user guide.
Matching Rules to Groups
The Partner Dashboard provides an engine for matching rules to user groups.
- Rules are sets of policies and configuration settings that you define and name.
- Groups are groups of users.
- You assign sets, as rules, to user groups. The services and options that a user sees are governed by these rules.
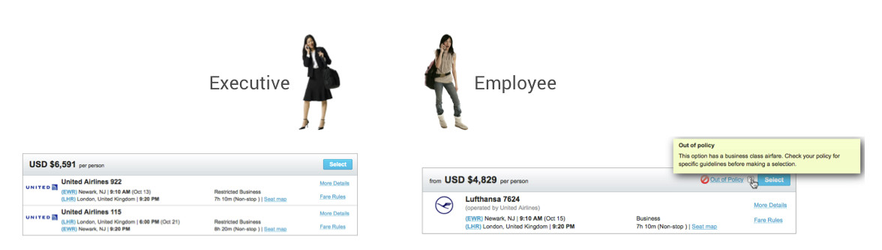
For example, a company may have a travel policy that allows executives to fly business class, while non-executive employees are allowed only to fly coach or economy class.
Groups make it possible for you to assign different rules to different types of users. A user’s access to services and other options is determined by the groups to which the user belongs.
This training session walks you through the mechanism that assigns rules to groups, so that you can navigate from a user group definition (such as VIPs or Everyone) to the actual configuration settings and policy choices in order to make changes.
You can find out how travel policies and display configurations are set up for travelers by clicking the Service Rules link under the Rules tab. You can then edit the service (in this case, Travel) for a specific group of travelers. The entire process is described in Service Rules, but the following are quick examples.
Travel Policy Example
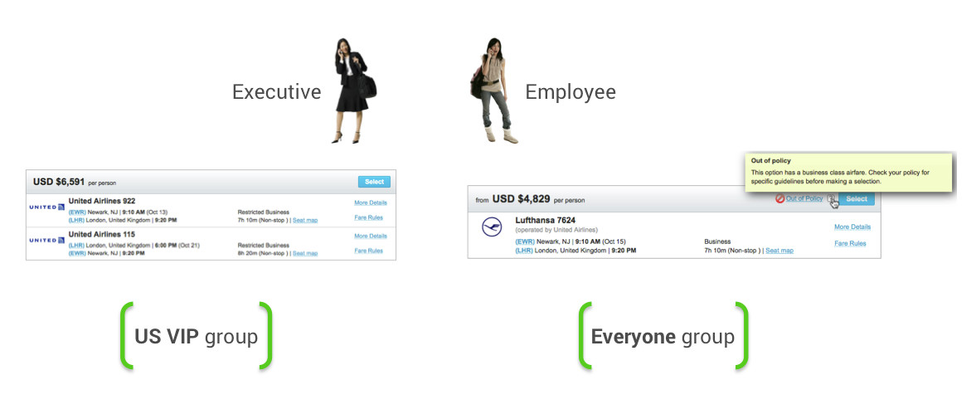
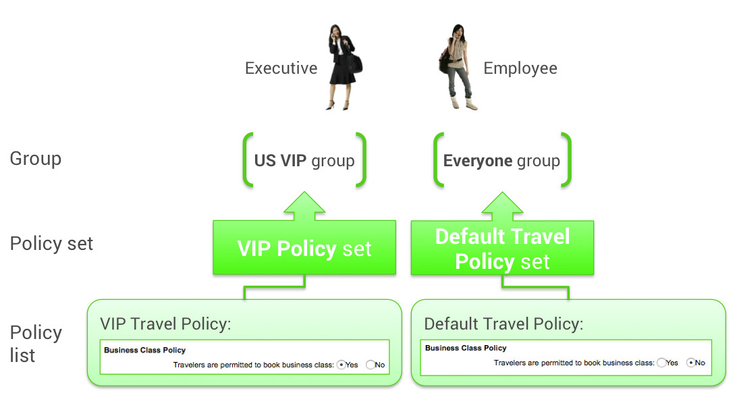
You might want to set travel policy to allow an executive to book a business class seat on a flight, but show business class as “out of policy” to a regular employee, as shown:
The following steps show how you would navigate to that policy to view it or change it:
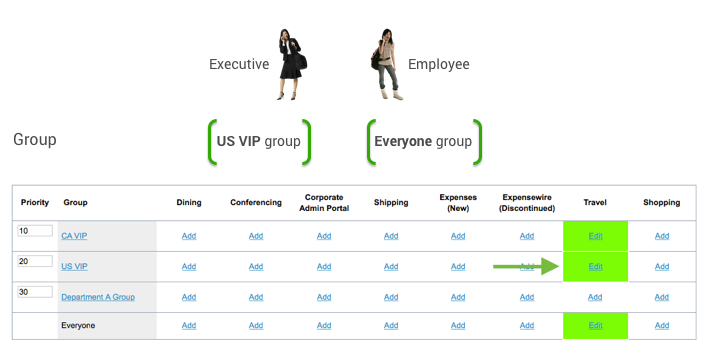
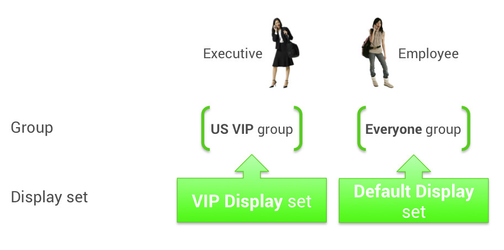
- Different groups have different rules. You would first find the group that you want to set or change. In this case, we want to examine the group for executives, known as the "US VIP" group. All employees are in the "Everyone" group. (You can visit Groups Tab for Managing Groups and Rules Tab for Managing Rules for details.)
- Click the Edit link in the Travel column, shown below, for the group you want to see (in this case, "US VIP"). You can view the Service Rules page for more instructions about these links.
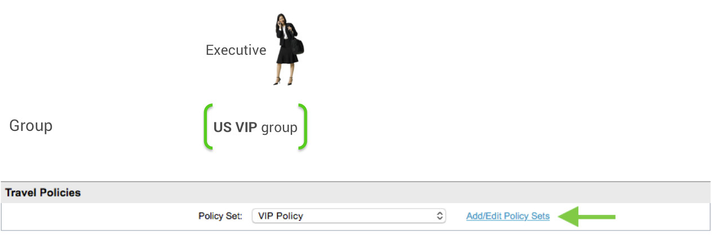
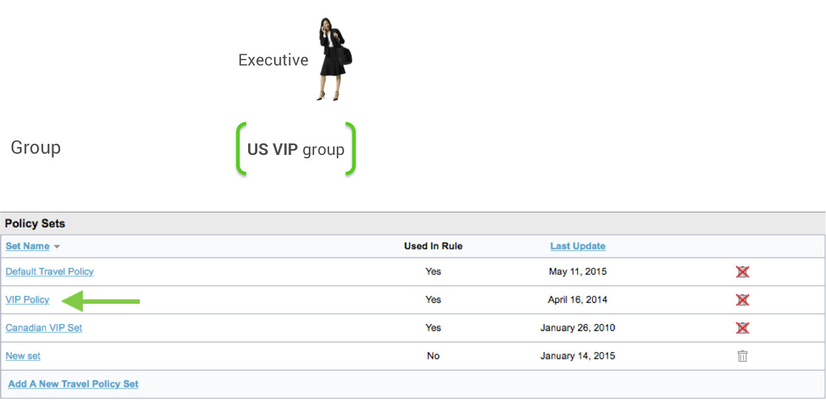
- Scroll down the Travel Rule page to Travel Policies to view (or choose) the set of travel policies for the US VIP group, as shown below. You can see which policy set is assigned to the US VIP group in the Policy Set dropdown menu. Click Add/Edit Policy Sets to see all of the policy sets that are available, or to add another one.
- The Policy Sets page appears with policy sets, as shown below. Click the name of the policy set chosen for this group (VIP Policy) to see what is inside the set.
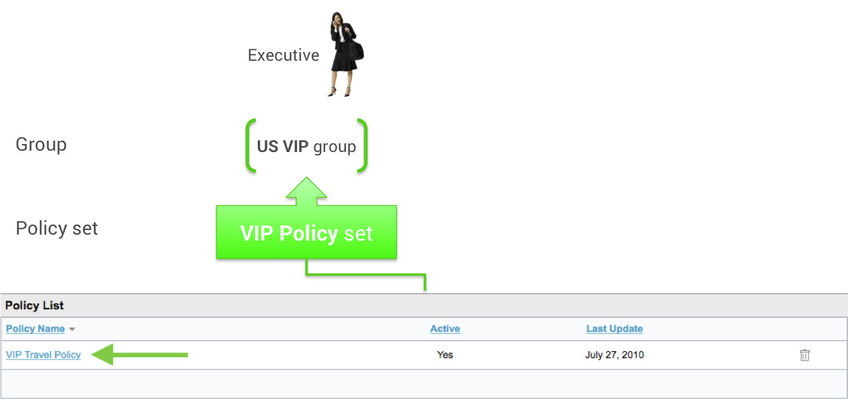
- The Edit page appears with a list of policies inside the set. Click the policy name (VIP Travel Policy as shown below) to see the policies.
- The Edit page for the policy list appears. Scroll this page to the Business Class Policy, as shown below. To learn about all of the policy settings on this page, see Adding or Editing a Travel Policy.
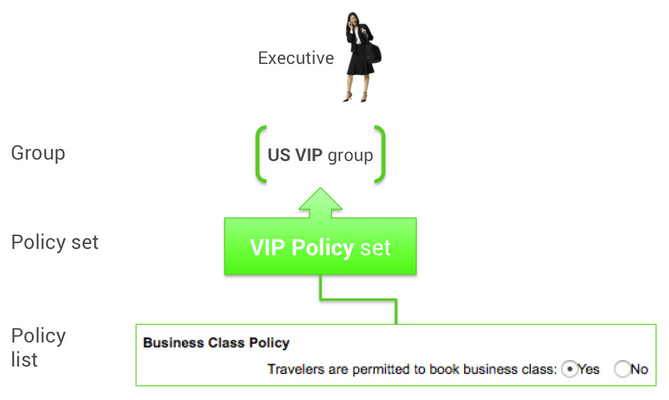
As you can see in the above figure, the Business Class Policy is set to "Yes" for the US VIP group. This is why their business class flights are not marked as "out of policy". For details about seating class policies, see "Setting Seating Class Policies" in Adding or Editing a Travel Policy.
To recap: Each group can have different sets of travel policies. In this case, we have a VIP Policy set that we can assign to groups such as US VIP, and a Default Travel Policy set that we can assign to the Everyone group.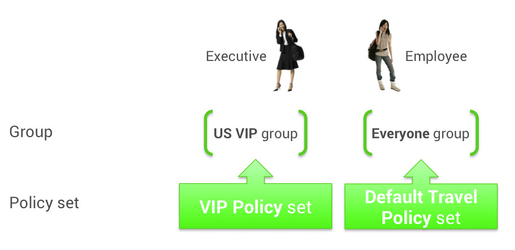
The policy sets have within them lists of policies, such as the Business Class Policy. For more information about travel policies, see Adding or Editing a Travel Policy.
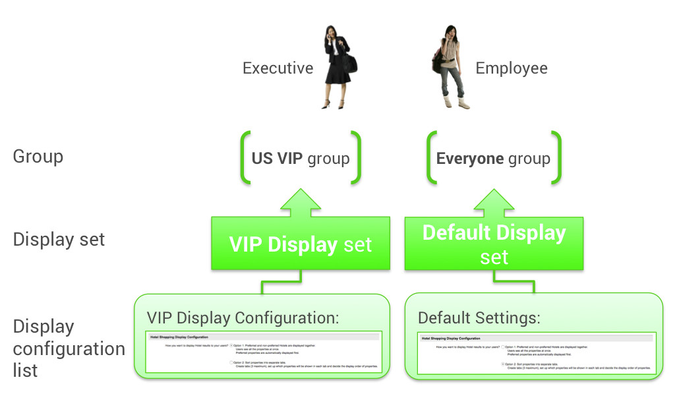
Travel Display Configuration Example
The display configuration controls how the system displays policy information to the user. You can control some of the options that appear for flight, hotel, and other services, and configure search results, show certain fare types, and so on. The entire process is described in Adding or Editing a Display Configuration.
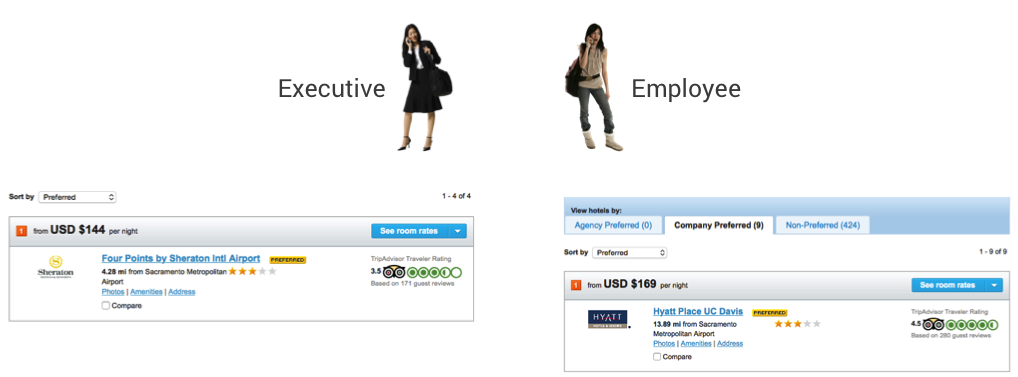
For example, for most employees, you can show hotel search results separated into tabs in order to direct them to preferred hotels. On the other hand, for executives, you can mix the hotel results into only one display to make choices easier.
The following steps show how you would navigate to that display configuration to view it or change it:
- You would first find the group that you want to set or change. In this case, we want to again examine the group for executives, known as the "US VIP" group. All employees are in the "Everyone" group. (You can visit Groups Tab for Managing Groups and Rules Tab for Managing Rules for details.)
- As you learned in the previous section, you can click the Edit link under Travel for the group you want to see (in this case, "US VIP"). You can view the Service Rules page for more instructions about these links.
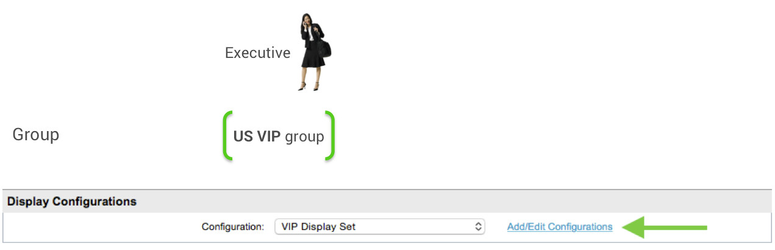
- Scroll down the Travel Rule page to Display Configurations to view (or choose) the configuration for the US VIP group (the entire page is described in Enabling Travel Rules). You can see which display configuration set is assigned to the US VIP group in the Configuration dropdown menu. Click Add/Edit Configurations to see the display configuration sets that are available, or to add another one.
- The Display Configuration Sets page appears with the display configuration sets. Click the name of the set chosen for this group (VIP Display Set) to see what is inside the set. This process is described in Adding or Editing a Display Configuration.
- The Edit page appears for the set with a list of display configurations. Click the display configuration name (VIP Display Config), and scroll the Edit page to Hotel Shopping Display Configuration, shown below. You can visit Hotel Shopping Display Configuration for details about editing hotel display configurations.
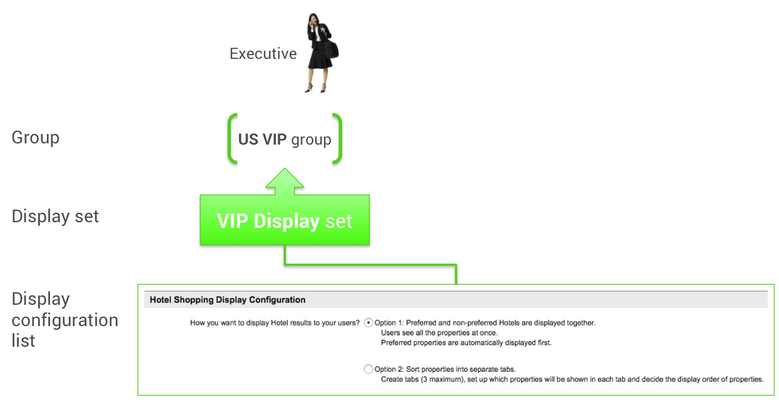
As you can see, the Hotel Shopping Display Configuration is set to Option 1 for the US VIP group. This is why hotels show up under one tab.
Each group can have different sets of display configurations. In this case, we have a VIP Display set that we can assign to groups such as US VIP, and a Default Display set that we can assign to the Everyone group.
The display configuration sets have within them lists of display configurations, such as the Hotel Shopping Display Configuration.
These are described in detail in Adding or Editing a Display Configuration, which is described in more detail in another session: Setting Travel Policies and Configurations.
How Rules and Groups Work
An organization typically needs more than just the Everyone group, which includes all of the organization's employees. You might need a subset of Everyone for executives (such as the "US VIP group" in the previous section). You might need a different subset that uses a different agency configuration, such as one set up for a different country or a different global distribution system (GDS) such as Sabre or Apollo.
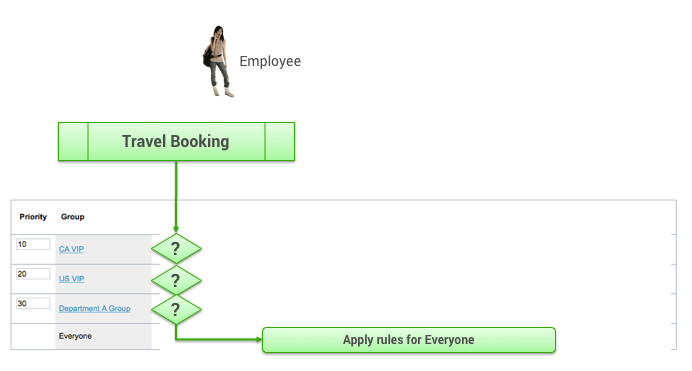
You want to apply rules to everyone, but also create groups with rules that are different. Since everyone is automatically in the Everyone group, the groups you create can be prioritized to decide which rules will be applied when a user is a member of more than one group. In other words, if you are a VIP, you are probably a member of the VIP group as well as the Everyone group; however, the VIP group is prioritized so that when you book travel, the rules of the VIP group apply to you.
The Priority column appears to the left of each group. All employees are members of the Everyone group. Other groups are ordered by the lowest number to the highest number.
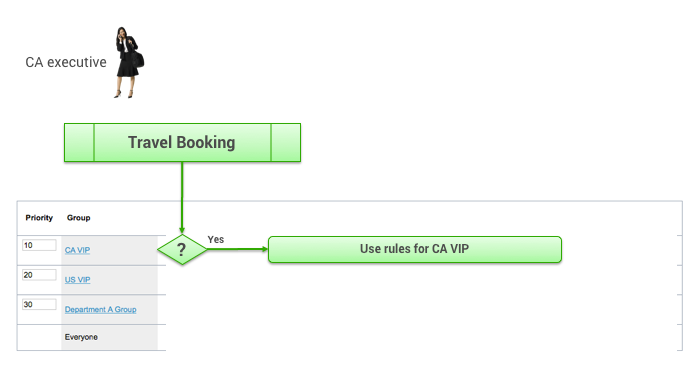
When a user creates a travel booking, the system checks to see if the user is in any of the groups, working down from the highest priority number to the lowest. For example, if a Canadian-based executive (a member of the CA VIP group as shown above) creates a booking, the system would use the rules for the CA VIP group.
When a US-based executive (a member of the US VIP group) creates a booking, the system checks to see if the user is in any of the groups. Since the executive is in the US VIP group, the system uses the rules for US VIP group.
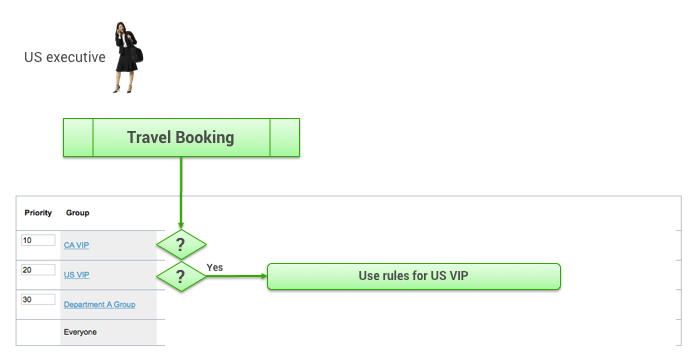
When a regular employee (a member of the Everyone group) creates a booking, the system checks to see if the user is in any of the groups higher in priority, and since the employee is not in any of those groups, the system uses the rules for the Everyone group.
The following is a step-by-step example of how you can set up rules for groups, and why you would set up one or more VIP groups in a certain priority above the Everyone group:
- Assign to the Everyone group the sets of travel policies and configurations you want everyone to have. For example, you want everyone to be able to book all seat classes except first class, which is designated "out of policy".
- Create a group for users who need one or more of the policies and configurations in the sets changed in a specific way, such as a VIP group.
- Assign all of the same policies and configurations as for the Everyone group, except change those policies and configurations that require changes. For example, first class seats should be allowed for VIPs, but all the other policies and configurations should be set the same way as for the Everyone group.
- Create a subset group of VIPs who need another specific configuration setting but are otherwise the same as the VIP group. For example, you could create a "CA VIP" (Canadian VIP) group that needs a specific setting for rail by including a subset of the VIP group who live in Canada.
- Place the subset group of VIPs above the other VIP group to be sure that the system picks the CA VIP group rather than the larger VIP group or the Everyone group.
Continue This Topic
Now that you understand why you would create groups and prioritize them, you can start creating groups as described in Groups Tab for Managing Groups, and assign rules to the groups as described in Rules Tab for Managing Rules.
Next Topic
When you are familiar with groups and rules, you are ready to tackle the next session, Setting Travel Policies and Configurations.