Setting Up Partner Dashboard Administrators
- IT Info
- Kavita Pillai
As a super-domain administrator with access to the Administrators tab, you can assign administrators more than one role at both levels.
Administration Roles
Administrators are responsible for maintaining a site (domain) or a group of sites within a super domain. As a super-domain administrator, you can:
- Add administrators for any or all of the roles.
- Search for administrators and edit their information or change their passwords.
- Deactivate an administrator in order to remove access to the Partner Dashboard. (Deactivation is the preferred method of removing access so that you still have a history of the access that was available to the administrator.)
- Delete an administrator.
Note: An administrator can't access his or her own profile.
The Partner Dashboard offers two levels of control, the super domain level and the domain (site) level. While you can assign yourself or another administrator more than one role at both levels, the following two levels of administration match these levels of control, so that the tasks of managing a group of sites, managing administrators, and maintaining sites are kept separate:
- Super Domain Admin: This level provides access to the super-domain level of the Partner Dashboard. It includes the following roles:
- Administration Manager: Full access to the super-domain level for creating and managing site templates, organizing sites into groups, accessing super domain configurations, viewing insights, and creating and deleting administrators.
- This role is the only one with access to the Administrators tab of the super-domain level.
- This role includes full access to all tabs at the Domain Admin level.
- Domain Creator: Partial access to the super-domain level for creating and managing site templates and viewing insights.
- This role includes full access to the Settings, Users, Services, Groups, Rules, and Reports tabs at the Domain Admin level (Profiles tab is not available).
- Super Domain Administrator: Partial access to the super-domain level for creating and managing site templates, organizing sites into groups, accessing super domain configurations, and viewing insights.
- This role includes full access to the Settings, Users, Services, Groups, Rules, and Reports tabs at the Domain Admin level (Profiles tab is not available).
- Administration Manager: Full access to the super-domain level for creating and managing site templates, organizing sites into groups, accessing super domain configurations, viewing insights, and creating and deleting administrators.
- Domain Admin: This level includes access to one or more sites within the super domain. It includes the following roles:
- Bulk User Manager: Access to the Users tab only.
- Domain Administrator (also known as Site Administrator): Full access to the Settings, Users, Services, Groups, Rules, and Reports tabs. (Profiles tab is not available.)
- Profile Extract Administrator: Partial access to the Profiles tab only, to create an extract file and view extract activity logs.
- Profile Upload Administrator:Partial access to the Profiles tab only, to schedule profile and unused ticket uploads, download templates, and view upload activity logs.
- Profile Upload Log Access: Partial access to the Profiles tab only, to view upload activity logs.
- Reporting Manager: Access to the Reports tab only.
- Service Administrator:
- Full access to the Users, Services, Groups, and Reports tabs.
- Partial access to the Settings tab, to manage site settings for emails, the home page, uploading a logo image, and setting Mobile use.
- Partial access to the Rules tab, to manage service rules and dynamic profile attribute assignment rules.
- User Adoption Manager: Partial access to the Users tab only, to add or edit users, perform single-user activation or deactivation, send reminders, impersonate users, and view user statistics.
- User Manager and User Adoption Manager: Partial access to the Users tab only, to add or edit users, perform single-user activation or deactivation, send reminders, impersonate users, and view user statistics.
Adding and Managing Administrators
As a super-domain administrator, you can add administrators for any or all of the roles described in "Administration Roles". You can also search for administrators and edit their information or change their passwords.
After logging into the Partner Dashboard as a super-domain administrator, click the Administrators tab. The Administrators | Overview page appears with search fields for finding administrators in the super domain.
Note: Only the Administration Manager role at the Super Domain Admin level has access to this tab. At least one person in your organization should already be set up in this role by Deem. See "Administration Roles" in this topic for role details.
Adding an Administrator
To add an administrator, follow these steps:
- Click the Add a New Dashboard Administrator link. The Add Administrator page appears.
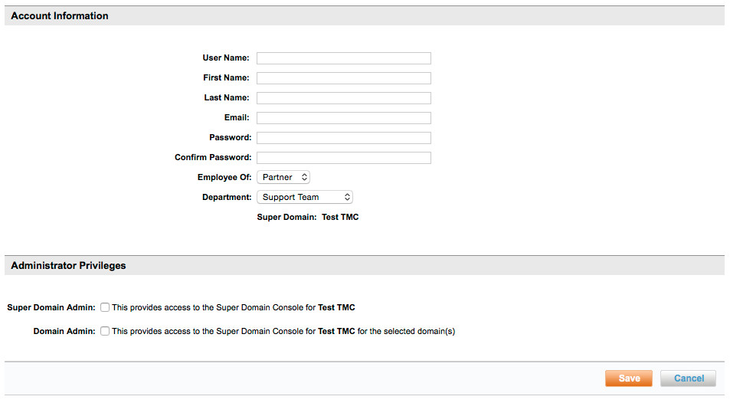
- Enter the following (all are required fields):
- User Name: Enter the user name for this administrator. The name must be unique to the Partner Dashboard.
Note: This user name is not linked to or associated with a user name in Deem. If you want to use Deem services as a user (without impersonating another user), add yourself as a user separately. See Adding a User Profile for instructions. - First Name, Last Name, and Email: Enter the administrator's first and last name and email address.
- Password: Enter the password the administrator will use to access the Partner Dashboard.
Note: The password must include at least one numeric character and one alpha character. It may not contain the user name, user first name, or user last name. It may also not include a common word or name. For example, an acceptable password would be p8ssw0rd, but not passw0rd because “pass” is a common word. - Confirm Password: Enter the same password to confirm it.
- User Name: Enter the user name for this administrator. The name must be unique to the Partner Dashboard.
- Employee Of (optional): Choose one of the following from the dropdown menu:
- Choose Partner for an administrator who needs access to both the Super Domain Admin level and the Domain Admin level, as described in "Administration Roles" in this topic.
- Choose Client for an administrator who needs access to only the Domain Admin level, as described in "Administration Roles" in this topic.
- Department (optional): Select Support Team, Customer Service, or Deployment from the dropdown menu.
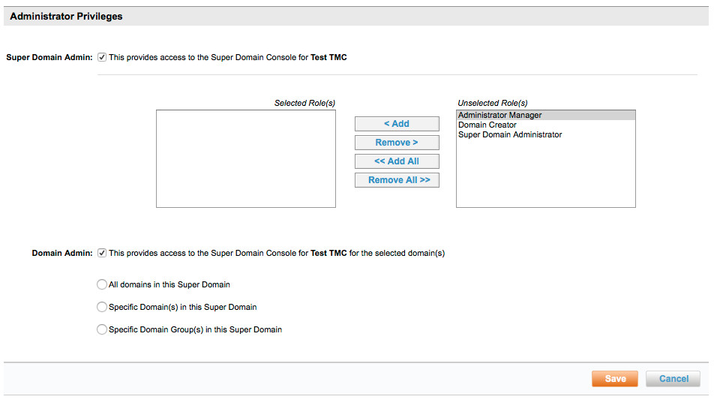
- In the Administrator Privileges section (shown above), click the Super Domain Admin checkbox if you want to provide super-domain access to this administrator. A list of unselected roles appears in the Unselected Role(s) box on the left. Choose one of the following:
- To assign all roles, click the Add All button. The roles move from the Unselected Role(s) box to the Selected Role(s) box.
- To assign only one or a few roles, follow these steps:
- Select the role in the Unselected Role(s) box. You can select multiple roles by holding down the Control key while selecting.
- Click Add to add the selected role or roles.
Note: To remove a role, click the Remove button. To remove all roles, click the Remove All button.
- In the Administrator Privileges section (shown above), click the Domain Admin checkbox to provide the administrator super-domain access to multiple sites (domains), or to provide domain access to a single site. Choose one of the following options:
- All domains in this Super Domain: Click this radio button to grant access to all sites in the super domain. A list of unselected roles appears in the Unselected Role(s) box on the left. Choose one of the following:
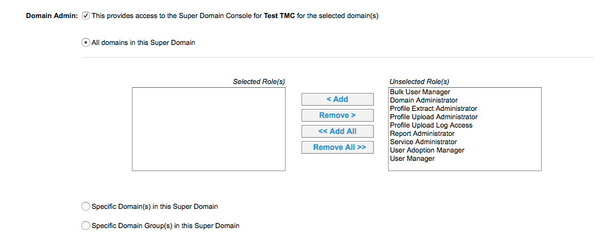
- To assign all roles, click the Add All button. The roles move from the Unselected Role(s) box to the Selected Role(s) box.
- To assign only one or a few roles, follow these steps:
- Select the role in the Unselected Role(s) box. You can select multiple roles by holding down the Control key while selecting.
- Click Add to add the selected role or roles.
Note: To remove a role, click the Remove button. To remove all roles, click the Remove All button.
- Specific Domain(s) in this Super Domain: Click this radio button to grant access only to specific sites (a.k.a. domains) in the super domain. A list of unselected domains appears in the Unselected Domain(s) box on the left, and a list of unselected roles appears in the Unselected Role(s) box underneath. Follow these steps:
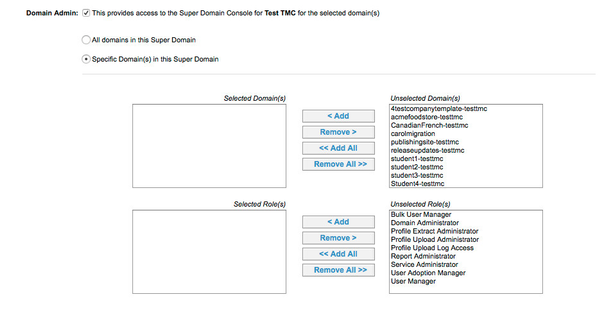
- Choose one of the following for Unselected Domain(s):
- To assign all domains, click the Add All button. The domains move from the Unselected Domain(s) box to the Selected Domain(s) box.
- To assign only one or a few domains, follow these steps:
- Select the domain in the Unselected Domain(s) box. You can select multiple domains by holding down the Control key while selecting.
- Click Add to add the selected domain or domains.
Note: To remove a domain, click the Remove button. To remove all domains, click the Remove All button.
- Choose one of the following for Unselected Role(s):
- To assign all roles, click the Add All button. The roles move from the Unselected Role(s) box to the Selected Role(s) box.
- To assign only one or a few roles, follow these steps:
- Select the role in the Unselected Role(s) box. You can select multiple roles by holding down the Control key while selecting.
- Click Add to add the selected role or roles.
Note: To remove a role, click the Remove button. To remove all roles, click the Remove All button.
- Choose one of the following for Unselected Domain(s):
- Specific Domain Group(s) in this Super Domain: Click this radio button to grant access only to specific groups of sites (a.k.a. domains) in the super domain. A list of unselected domain groups appears in the Unselected Domain Group(s) box on the left, and a list of unselected roles appears in the Unselected Role(s) box underneath.
Note: To learn about site grouping, see Managing and Configuring Groups of Sites.
Follow these steps:- Choose one of the following for Unselected Domain Group(s):
- To assign all domain groups, click the Add All button. The groups move from the Unselected Domain Group(s) box to the Selected Domain Group(s) box.
- To assign only one or a few domain groups, follow these steps:
- Select the group in the Unselected Domain Group(s) box. You can select multiple groups by holding down the Control key while selecting.
- Click Add to add the selected group or groups.
Note: To remove a group, click the Remove button. To remove all groups, click the Remove All button.
- Choose one of the following for Unselected Role(s):
- To assign all roles, click the Add All button. The roles move from the Unselected Role(s) box to the Selected Role(s) box.
- To assign only one or a few roles, follow these steps:
- Select the role in the Unselected Role(s) box. You can select multiple roles by holding down the Control key while selecting.
- Click Add to add the selected role or roles.
Note: To remove a role, click the Remove button. To remove all roles, click the Remove All button.
- Choose one of the following for Unselected Domain Group(s):
- All domains in this Super Domain: Click this radio button to grant access to all sites in the super domain. A list of unselected roles appears in the Unselected Role(s) box on the left. Choose one of the following:
- Click Save to add the administrator.
Note: To commit all of your changes after saving them, click the changes not applied link at the top of the page. The Commit Changes page appears. Click the Commit button.
Searching For and Editing an Administrator
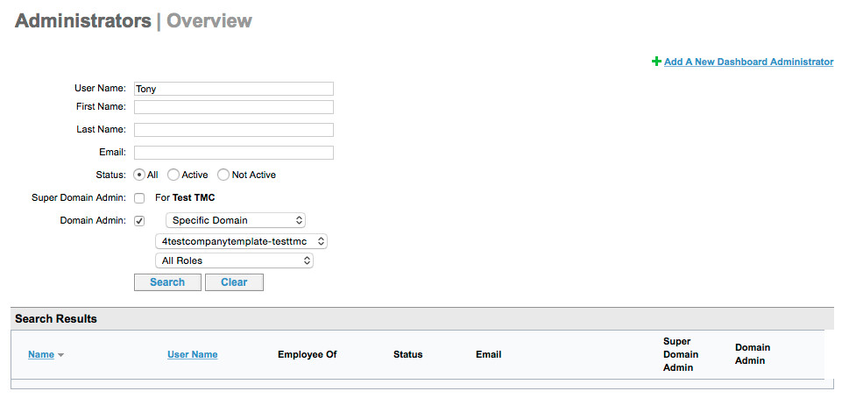
To search for an administrator, click the Administrators tab. The Overview page appears with fields for searching.
Note: If you have fewer than 200 administrators, you can just click the Search button to see all administrators.
Enter the search criteria to filter your search:
- Enter the administrator's full or partial user name, first name, last name, or email.
- (Optional) You can refine your search by clicking a radio button for Status (Active, Not Active, or All).
- (Optional) Click one or more checkboxes to include only administrators at the Super Domain Admin or Domain Admin levels. If you choose Domain Admin, you can also choose All Domains, Specific Domain and a domain (as shown above), or Specific Domain Group and a group from the dropdown menus.
- (Optional) You can filter by role by selecting a role or All Roles from the dropdown menu.
- Click Search to perform the search.
The list of administrators appears in the Search Results section. You can do the following:
- To display and edit an administrator’s information and privileges, click the Name link for that administrator. The Edit Administrator page appears. You can then:
- Deactivate an administrator and remove access to the Partner Dashboard: Uncheck the "Is Active" checkbox, and confirm the action by clicking OK.
Note: Deactivation is the preferred method of removing access so that you still have a history of the access that was available to the administrator. - Edit the administrator's information.
- Deactivate an administrator and remove access to the Partner Dashboard: Uncheck the "Is Active" checkbox, and confirm the action by clicking OK.
- To change the administrator's password, click the Change Password link for that administrator. You can then enter a new password, enter it again to confirm it, and click Save.
- To delete an administrator, click the Delete link for that administrator, and confirm the action by clicking OK.
Note: An administrator can't access his or her own profile.
Tip: You can change the sort order of the search results by clicking the Name or User Name links at the top of the search results.
Note: To commit all of your changes after saving them, click the changes not applied link at the top of the page. The Commit Changes page appears. Click the Commit button.
To learn more about managing sites, see Managing and Configuring Groups of Sites.