Adding a User Profile
- Former user (Deleted)
- Kavita Pillai
As a site administrator or support person with access to the Users tab, you can add a user to create a user profile.
Note: In many cases, users are added by means of a Human Resources (HR) feed or other method, such as open enrollment. See Managing and Supporting Site Users for an overview.
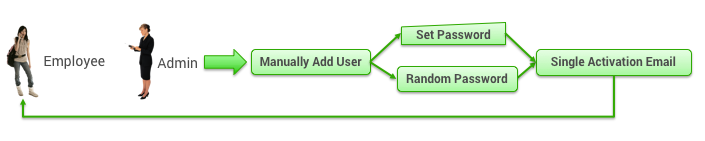
You can set a general password or a random password that the user can change. You add the initial profile information, and the user enters the rest of the profile information after receiving the activation email. You can send out an activation email as described in Single User Activation.
To add a user, log into the Partner Dashboard as a site administrator and follow these steps:
- Click the Users tab. The Users | Overview page appears.
- Click the Add a New User link. The Users | Add a User page appears.
- Under the Account Information heading, leave the Support Account option unchecked. A support account is usually a site administrator or someone who will perform testing or QA on a site and not be a traveler. If checked, this user will not appear in the reporting for the site and will not be overridden by a profile upload.
- Enter the required information under the Account Information heading:
- User Name: (Required) Enter the new user’s user name for accessing Deem. This name must be unique to the site. You may want to use the user’s first initial and last name.
Note: The format of the User Name should be consistent across the site. - External ID: (Required) Enter the new user’s external ID, which must be unique to the site. The external ID is often the employee number.
- Email: (Required) Enter the new user’s email address, which must be unique to the site.
- Groupware ID: Enter the new user’s groupware ID. The system automatically populates this field with the user’s email address entered above.
- Title: Select the new user’s title from the dropdown menu.
- First Name: (Required) Enter the new user’s first name.
Note: It is important for the First, Middle and Last Name to agree with the government issued documents (such as a passport or driver's license) that will be presented at the airport for check in. - Middle Name: Enter the new user’s middle name.
- Last Name: (Required) Enter the new user’s last name.
- User Name: (Required) Enter the new user’s user name for accessing Deem. This name must be unique to the site. You may want to use the user’s first initial and last name.
- Travel Approver Settings: If you have enabled pre-trip approval, choose the traveler's approver from the Travel Approver Name dropdown menu. If the user is a travel approver, click the checkbox for Travel Approver Permission to give the user the ability to approve or decline trips. For details, see Setting Up Pre-Trip Approval.
- Site Administrator: Click this checkbox if this user should have access to the Admin Access Dashboard, which includes analytics on spending for multiple service categories. For self-service sites, see Self-service Admin Access. For serviced sites, see Admin Access.
- Activate Account: Click this option to immediately activate the account. Password options and the Activation Email setting appear. Select one of the following:
- Have system generate random password: The system will generate an activation email and require the password be changed by the user upon first log in.
Note: The "Force user to change password on first login" and "Generate Activation Email" are turned on for this option and can't be turned off. - Pre-define password for user: You can define a password as the administrator. The user and will need to change it upon first log in.
Note: The "Force user to change password on first login" is turned off for this option, and you can click the checkbox to turn it on. The "Generate Activation Email" is turned off and can't be turned on. If you select this option, continue the following steps:- Password: Enter the password, which must be changed by the user upon first login.
- Re-enter Password: Enter the password again to confirm it.
- Activation Email: Select this checkbox to send the new user an activation email.
- Preview Activation Email: Click this link to preview the completed activation email. Enter the email address to receive the activation email preview when prompted.
- Have system generate random password: The system will generate an activation email and require the password be changed by the user upon first log in.
- Click one of the following buttons at the bottom of the page:
- Save User: Save your changes.
- Save & Add Another: Save changes and continue adding users. The Add a User page appears.
- Save & Edit User: Save changes and then edit the user information. The Edit a User page appears. You can add or change the user's personal and employee info, addresses, emergency contact, payment cards, travel preferences, delegates, and display settings. See Editing a User Profile and Setting Delegates.
- Cancel: Cancel the changes.
Note: To commit all of your changes, click the changes not applied link at the top of the page. The Commit Changes page appears. Click the Commit button.
To add or change the user's personal and employee info, addresses, emergency contact, payment cards, travel preferences, delegates, and display settings, see Editing a User Profile and Setting Delegates.
To learn about other methods of adding users, and how to manage users, see Managing and Supporting Site Users.