This topic describes adding or editing train private rates on the Add or Edit page.
Table of Contents
Overview
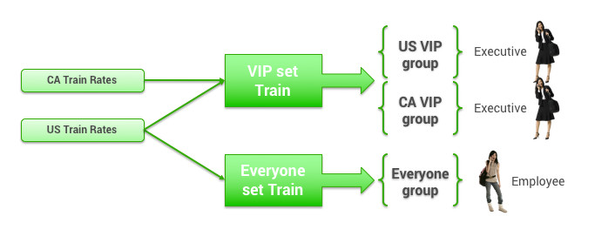
In order to have different private rates in effect for different groups, you create or edit each private rate, and then organize the private rates into sets that can be assigned to groups. You can add the same rate to more than one set.
Tip: For a description of groups, see Groups Tab for Managing Groups.
Navigating to the Add or Edit Page
...
- Click the Services tab.
- Click Private Rates. The Private Rates page appears.
- Click the Train Rates link under the Private Rates heading. The Train Rates page appears with a list of rates.
- Click Add a New Train Private Rate to add a new train rate, or click the name link in the Code Name column to edit an existing private rate. The Add or Edit page appears, showing the sections below (starting with "General Settings").
...
- Click the Add/Edit Train Rate Sets link on the Rules page for the group (as described in Enabling Travel Rules). The Train Rate Sets page appears.
- Choose one of the following:
- To add a new set, see "Adding a New Rate Set" in this topic for further instructions.
- To view or edit an existing set, click the set name in the Set Name column. The Edit page appears with a list of rates.
- Click an existing rate name in the Code Name column to edit that rate. The Edit page appears, showing the sections below (starting with "General Settings").
...
- Select a train carrier from the dropdown menu.
- Enter the train discount code.
- Enter a message to display to travelers on the review and purchase pages describing the discount to be applied at time of purchase.
Saving the Rate
Click Save to save the new train private rate information. You can then add the rate to a set so that you can assign the set to a group.
You need to add the rate to a set in order to assign it to a group. To add the rate to an existing set, see "Adding a Rate to an Existing Set" in this topic. To add a new set, see "Adding a New Rate Set".
Tip: For a description of groups, see Groups Tab for Managing Groups.
...
- On the Train Rate Sets page, click an existing set name in the Set Name column. The Edit page appears.
- Edit the name in the Private Rate Set Name field. This name should be easily recognizable as a specific set. An example is "Train Rate Set 1".
- Click the Add Rates button. The Search & Add Rates page appears.
- Select a rate to add to the set by clicking its radio button.
- Click OK & Add Another to add another rate to the set, and repeat the previous step and this step until you've added all of the rates for the set.
- After making the final selection, click OK to finish adding to the set.
- Click Save to save your changes.
Note: To commit all of your changes after saving them, click the changes not applied link at the top of the page. The Commit Changes page appears. Click the Commit button.
...
- Enter a name in the Private Rate Set Name field. This name should be easily recognizable as a specific rate set. An example is "Train Rate Set 2".
- Click the Add Rates button. The Search & Add Rates page appears.
- Select a rate to add to the set by clicking its radio button.
- Click OK & Add Another to add another rate to the set, and repeat the previous step and this step until you've added all of the rates for the set.
- After making the final selection, click OK to finish adding to the set.
- Click Save to save your changes.
Note: To commit all of your changes after saving them, click the changes not applied link at the top of the page. The Commit Changes page appears. Click the Commit button.
...