Setting Up Dynamic Site Messaging
- Former user (Deleted)
- Malissa Olofernes (Unlicensed)
- Former user (Deleted)
Overview
Dynamic Site Messaging (DSM) is a process where a company or agency administrator can create, change and delete custom messages on Deem Travel. The purpose of these messages is to communicate certain travel policy or supplier related information directly to the traveler during the booking process. They are dynamic in a sense, that they would only be displayed when certain criteria/components of the search form or supplier display/selections are met. The company/agency administrator will want to create these messages based on (but not limited to) certain date ranges, departure or arrival cities, suppliers, car types or airline classes of service etc.
"H" Release Enhancements
H Release Dynamic Site Messaging (DSM) Improvement
You can now configure a Dynamic Site Message to display only when users encounter specific search results. For example, site administrators can configure a message to display on the Search Results page only when a Hilton property is present on that results page. As the user scrolls through the hotel search results the Dynamic Site Message will only appear on those screens with a Hilton property. (i.e. You can create a DSM to include a most preferred property using the GDS ID for that property, whenever that property ID is present on a page the DSM message will display.) The system will re-run all DSM rules each time page is refreshed, to determine if a new, same or no message needs to display.
See Custom Fields for Dynamic Site Messaging for more information on setting up custom fields.
Enabling Dynamic Site Messaging (DSM)
Configuring Display Configuration
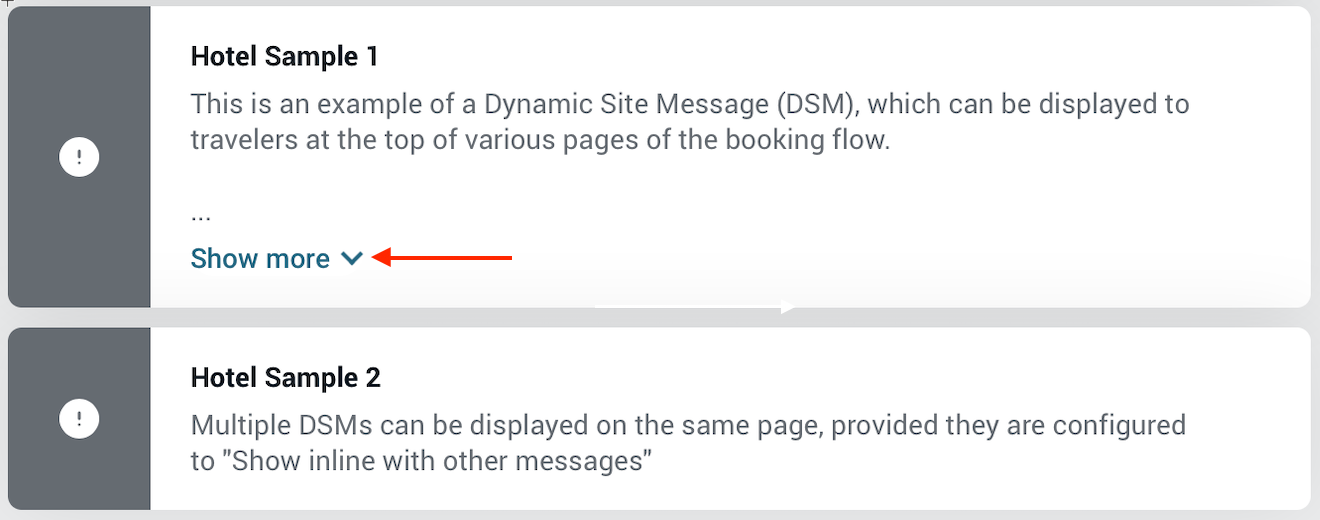
Please Note: If the message exceeds 160 characters, the user will see a “Show More” link below the message. If the message does not exceed 160 characters, the user will not see the "show more" link.
The first step when configuring DSM is to enable the feature on the Display configuration page.
- Sign into the Partner Dashboard as a site administrator, and click the Services tab. The Services | Overview page appears.
- Click the Policy Display link. The Services | Display Configuration Management page appears.
- Click the Display Configuration List link. The Services | Display Configuration List page appears.
- Add or change display configuration settings as described in Adding or Editing Display Configuration, keeping in mind that you can click Add A New Display Configuration to add a new display configuration that enables dynamic site messaging, or click the name link of an existing display configuration (one you have already set up) to enable dynamic site messaging.
- Scroll down the page to the Dynamic Site Messaging section and click the Yes radio button.
- Click Save to save your configuration changes and return to the Services | Travel page.
Configuring Custom Fields
The next step is to configure custom fields that define the messaging and where it will be displayed.
Creating a Collection
Create a Custom Field Collection that defines the custom fields, as described in Creating and Managing Custom Fields. Keep in mind the following:
- A custom field collection defines related custom fields.
- Enter a collection name in the Name field containing only characters A to Z, a to z, or digits 0 - 9 (no spaces). No further form completion is needed.
Click Save to save the collection.
Adding Custom Fields
Next, add one or more custom fields to the collection, as described in Creating and Managing Custom Fields. Keep in mind the following:
- Multiple messages can be defined to display on the same page. The field display order determines which message displays first. To update the display order of custom fields in the collection and therefore the order the messages will display, enter a display order number in the Display Order column, and click Update Display Order.
- For example, if you create the field “Mexico Travel” with number 1 as its display order, and "Outbound from LaGuardia" with number 2, "Mexico Travel" (number 1) will be the first message displayed and "Outbound from LaGuardia" would display under it.
To create a custom field for dynamic site messaging, choose DSM (dynamic site messaging) from the Field Type dropdown menu, as described in "Field Type: Dynamic site messaging (DSM)" in Creating and Managing Custom Fields.
Note: Please enter a support case (see Entering a Support Case) for assistance from Deem with JavaScript.
Changing the Display Order of the Custom Fields
Be sure to click Save to save your custom fields and return to the Custom Fields page, which shows a list of custom fields in the collection.
The display order determines which message is displayed first.
After creating custom fields in your collections, add the collections to a Custom Field Set, as described in "Adding Collections to a Set" in Creating and Managing Custom Fields. A set may contain all the dynamic site messaging custom fields, or you may have multiple sets.
Next attach the custom field set to service rules to define what groups of users will see the custom fields.
Enabling the Travel Service Rules
Next you need to bind the newly added or edited configurations as Travel service rules for one or more specific group of users. For an overview of how rules and groups work, and to define groups, see Groups Tab for Managing Groups.
Follow these steps to add or edit the Travel service rule for a group:
- To add or edit a Travel service rule for a group, click the Add or Edit link in the Travel column for the group row, as described in Service Rules.
- Agency configuration: Select the agency configuration you saved (as described in Adding or Changing Agency Settings) from the dropdown menu in the Agency Configuration section as described in Enabling Travel Rules.
- Custom field set: Choose the previously configured custom field set from the dropdown menu in the Custom Fields subsection, as described in "Custom Fields" in Enabling Travel Rules.
- Click Save at the bottom of the page to save the rule.
Note: To commit all of your changes, click the changes not applied link at the top of the page. The Commit Changes page appears. Click the Commit button.
Dynamic Site Messaging Use Cases and Scripts
For Dynamic Site Messaging use cases and scripts, see Dynamic Site Messaging Use Cases and Scripts.