Custom fields are available if you need to collect custom information or provide additional services such as pre-trip approval or a specialized booking. As an administrator, you can create custom fields to appear during the booking and purchase flow that can be set as required or optional for users to fill out.
...
Adding a Custom Field Collection
A custom field collection defines related custom fields and where (on which page) they should appear. For example, you may want to define a custom field collection of fields for a specific billing process, or one or more collections for pre-trip approval.
Tip: If you are creating a collection for pre-trip approval fields, create one collection for generating only a notification, and a separate collection for generating approve-or-decline requests with the notification. The same collection can't contain a notification-only field and an approve-decline field.
...
- In the "Include Collection in following pages" section, click the Ask for User Input on Trip Search Planner (search) Page checkbox to show the custom field as an editable field on the Trip Search Planner (search) page.
- Make Collection Optional for User: Click this checkbox to make the field optional on the Trip Search Planner (search) page. The user can click a checkbox on the page to show the custom field.
- Display on Trip Review Page: Click this checkbox to show the custom field on the Trip Review page. We recommend that if the field appears on the Trip Search page, it should also appear on the Review page.
- Ask for User Input on Purchase Page: Click this checkbox to show the custom field on the Trip Purchase page.
Tip: For pre-trip approval collections, click this checkbox to show the fields on the Trip Purchase page. - Display on Trip Confirmation, Trip Details and eMail Notification Pages: Click this checkbox to show the custom field on the Trip Confirmation, Trip Details, and eMail Notification pages.
- Include Collection as part of “Change your trip” pages: Click this checkbox to show the custom field on the “Change your trip” pages.
- In the Conditional Display of Collection section, you can enter JavaScript to set conditions for which the custom field collection will appear or not. For example, if the arrival city is Miami, display a custom field collection. For any other arrival city, the custom field collection would not appear.
Note: Enter a support case (see Entering a Support Case) if you need assistance from Deem with the JavaScript modification.
...
- If you are not already on the Custom Field Collections page (after adding a collection as described in the previous section), click the Custom Field Configuration link on the the Services | Travel page.
- Click the collection name in the Collection Name column of the Custom Field Collections page.
- To add a custom field, click the Add Custom Field link on the Custom Fields page, or click the field name in the Field Name column to edit a custom field. The Add or Edit page appears.
- In the Field Information section, enter the field name.
Note: Any reference to this field (such as in a validation JavaScript, conditional display JavaScript, PNR, queue placement JavaScript, and so on) will need to use this name. The name can't include spaces and has a maximum length of 128 characters. The value can be alphanumeric, but the first character must be an alpha character. The field name must be unique and is case sensitive. The field name can be referred as part of the validation JavaScript, so the name of the field should comply with the JavaScript field definition syntax.
Warning: Any changes to the field name once it is saved will result in the need for programming changes.
...
- Label: Enter the label that will be displayed for the custom field. The maximum size is 128 characters.
Tip: For a pre-trip approval field enabling the user to enter a reason for the trip (to send to the approver), you might use "Reason for Trip (Sent to Approver)". - Tooltip: Enter the tooltip for the custom field. The tooltip appears when the user hovers a pointer over the field.
Tip: We recommend that any constraints for this field be displayed as part of the tooltip. For example, if you are showing a text field limited to 30 characters, include a mention of that limitation or restriction in your tooltip.
...
- Field Type: Choose Text, Checkbox, Date/Time, Number, List, PTA (pre-trip approval), DSM (dynamic site messaging), or DSM Push (Mobile Push Notifications) from the dropdown menu.
Warning: Once the field has been saved, the field type cannot be changed. - For all field types except PTA and DSM, select the following:
Add to Open Enrollment Registration: Click this checkbox if the field should appear in open enrollment registration.
- Add to User Settings: Click this checkbox if the field should appear in the user profile. If you select this option, you can then choose the following options:
- Category: Choose the user profile category where this field should appear from the dropdown menu, such as Travel Preferences or Contact Information.
- Allow only Agency to View and Edit this field: Click this checkbox if only agency users should be able to see or change this field.
- Mandatory Field: Click this checkbox if the field should be required.
- Enter the Field Type Preference information based on your chosen field type, as follows.
...
- Display as: Choose one of the following:
- Select Box: A box of selections.
- Radio Buttons: You can also choose Vertical Align or Horizontal Align from the dropdown menuSingle Line or Multiple Line.
- Option Labels and Values: Enter the labels to display to the user, and the value to be placed in the field, separated by an equal sign. For example: CostCenter=CC to place the value "CC" in the CostCenter field.
- Sort labels alphabetically: Click this checkbox to sort the labels.
- Click the radio button for one of the following, to be used for the default selection in the list:
- Select first value as default: Use the first value as the default.
- Select value prefixed with "*" as default: Prefix the value with an asterisk ( * ) to mark that value as the default.
- Select no value as default.
...
- Require pre trip approval or send notification only: Click the radio button for "Approval required" or "Notification only".
- Send approval email to traveler's profiled approver? Click the radio button for Yes or No.
- Default approver email address: Enter the email address for the default approver.
- Secondary approver email address: Enter the email address for the secondary approver.
- Auto cancel declined PNRs? Click the radio button for Yes to automatically cancel declined itineraries.
Note: Offline-generated or offline-changed PNRs are not auto-cancelled. - Auto approve or cancel expired PNR's? Click the radio button for "Auto approve", "Auto cancel", or "Expire only".
- PTA Rules Description: Enter the text to display to the user on the Purchase page and in the email notification describing the rules (plain text only).
- Click the Advanced link at the bottom of the Field Type Preference section to enter the JavaScript criteria for this field.
...
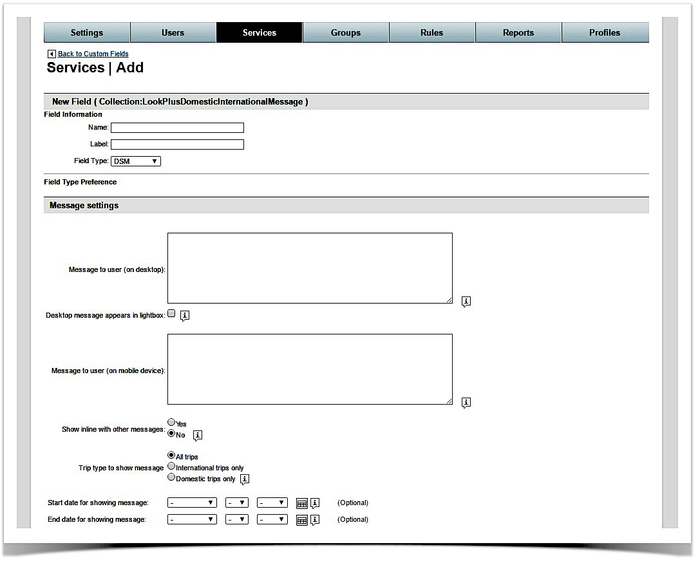
- Choose DSM in the Field Type dropdown menu.
- Enter the message to be displayed to the user. Plain text or HTML tags are allowed on desktop. Plain text only for mobile and maximum characters are 400.
- To display multiple messages select YES for the option to show inline with other messages. Select NO to display one DSM message.
- To have DSM messages display based on domestic, international or both market locations, select the appropriate radio button.
- Define where the messaging will be displayed. Select the checkbox beside:
- Search pages: Show message on Quick Start and / or Trip planner pages.
- Search result page: Show message on Search results page. You can designate the element present in results that will trigger the message. (air, rental car, hotel, and / or train)
- Review pages: Show message on Price change and / or Trip review pages.
- Pre-purchase pages: Show message on Hold trip and / or Trip purchase pages.
- Post-purchase pages: Show message on Trip confirmation and / or Trip details pages.
- Hotel page: Show message on Hotel details page.
- Car rental pages: Show message on Car rental pickup location and / or dropoff location pages.
- Cancellation pages: Show message on confirm cancellation and / or cancel cancellation pages.
- Emails: Show message on Trip confirmation, Hold trip, Modify trip and / or cancel trip emails.
- Change Trip Flow pages: Show message on change trip assistant, change trip details and / or change search pages.
- Enter any conditional requirements for the message to display using JavaScript.
Note: Please enter a support case (see Entering a Support Case) for assistance from Deem with JavaScript.
Tip: For Dynamic Site Messaging use cases and scripts, see Dynamic Site Messaging Use Cases and Scripts. - Save and commit your changes.
...
- Choose DSM Push in the Field Type dropdown menu.
- Enter the message to be displayed to the user. Plain text or HTML tags are allowed.
- Enter a URL - this is an optional field and will be used in the case when notification needs to direct user to an external URL such as corporate policy or security
- Enter a date range during which the rule should be triggered. (Optional)
- Enter the intervals for push notification from the following options:
- Prior to trip start date/time
- Prior to trip end date/time
- After trip start date/time
- After trip end date/time
- After trip creation date/time
- Click the Advanced link at the bottom of the Push Notification Interval section to enter the JavaScript criteria for this field.
- Note: Please enter a support case (see Entering a Support Case) for assistance from Deem with JavaScript.
Tip: For Dynamic Site Messaging use cases and scripts, see Dynamic Site Messaging Use Cases and Scripts. - Save and commit your changes.
...
- If you haven't already done so, after clicking the Services tab and clicking Travel, click Custom Field Configurationclick the Custom Fields link. The Custom Field Configuration page appears.
- Click the Custom Field Sets link. The Custom Field Sets page appears.
- Click the Add A New Custom Field Set link to add a new set. The Add page appears.
- Enter or edit the name in the Set Name field. This name should be easily recognizable as a specific custom field set in a dropdown menu.
- Click the Add Collection to Set button. The Add Custom Field Collection page appears.
- Click the checkboxes for the collections to add to the set.
- Click Add to add the collections to the set. The Add page reappears.
- Click Save to save the collection.
...