Reports Tab for Generating Reports
The Reports tab provides summary and detail reports, which you can schedule for later viewing.
After clicking the Reports tab, the Reports | Overview page appears with report scheduling functions. If your site has enabled Expense, the Scheduler and Expenses tabs appear, and the Scheduler tab with report scheduling functions is selected by default:
You can perform the following:
Scheduling Reports
After clicking the Reports tab, the Reports | Overview page appears with report scheduling functions. If your site has enabled Expense, the Scheduler and Expenses tabs appear, and the Scheduler tab with report scheduling functions is selected by default. The following are the limits of how many reports you can view at any one time, and the scheduling options:
- No more than 10 detailed reports spanning no more than three years prior to today, and containing no more than three months of data
- No more than 10 summary reports with one year of data (not changeable)
- No more than three instances of the same report per domain
The following are the options for scheduling reports:
- One Time Only: Run now
- Recurring: Daily, Weekly, Bi-weekly, or Monthly
- Report format: CSV, ZIP, or PDF
- Notification: After report is completed, an email can be sent to a specific email address.
Viewing Summary and Detail Reports
After scheduling reports, you can download the service activity summary and detailed reports. The three most recent reports generated for each schedule are maintained. Follow these steps:
- Click the View Summary and Detail Reports link. The View Summary and Detail Reports page appears.
- Click the file name to download the report. The file download dialog appears.
- Click the Open button to open the file, or the Save button to save the report file to your computer.
Scheduling a Report
You can create a new schedule to generate summary and detailed reports. You can schedule a maximum of 10 reports overall, and a maximum of three extracts per service. To schedule a report, follow these steps:
- After clicking the Reports tab, click the Schedule a Report link. The Schedule a Report page appears.
- Schedule Options: Choose Now, Monthly, Periodically, or Weekly from the Schedule dropdown menu. Depending on frequency selected, additional fields will open to more finely define when the report should run.
- Report Options:
- Choose the service (such as Travel) from the Service dropdown menu.
- Choose the type of report from the Report dropdown menu.
- Enter the report data range in the Report Data From and Report Data To dropdown menus.
- Job Options:
- Enter a name for the report in the New Job Name field. Include adequate information to identify this report when all reports are in a list.
- Enter an email address where a job completion email can be sent.
- Click Submit.
Managing Schedules
You can view, edit and delete existing report generation schedules. Follow these steps:
- Click the Manage Schedules link. The Manage Schedules page appears.
- Click the Edit link to edit the report detail. The Schedule a Report page appears.
- Click the Delete link to delete the scheduled report. A warning dialog appears. Click OK to continue deleting the scheduled future jobs.
Viewing Reports on Expenses
If your site has enabled Expense, the Scheduler and Expenses tabs appear on the Reports | Overview page. Click Expenses to see Expense summary and detail reports.
Choose the report from the Report dropdown menu:
Executive Summary
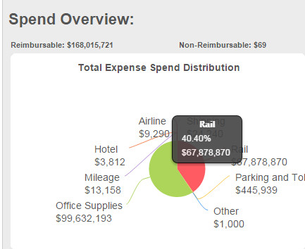
Choose this report for an overview of spending that shows reimbursable, non-reimbursable, and billable amounts, the total spend by month, the total spend distribution, and top expense types to show spending trends.
- To set the dates for the report, click the calendar icons for the Start Date and End Date. Click Refresh to refresh the report dates and view the report.
- You can hover your pointer over a portion of the distribution pie charts to see more detailed information:
Department Spend Detail
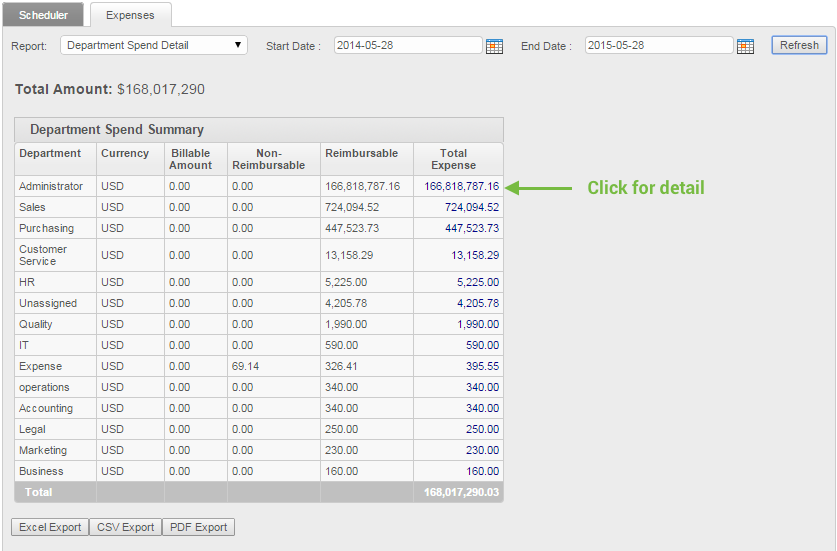
Choose this report for a summary of expense reports per department:
- To set the dates for the report, click the calendar icons for the Start Date and End Date. Click Refresh to refresh the report dates and view the report.
- To see an employee's reports, click the amount link in the Total Expense column. You can then click the amount in the Total Expense column for each report to see line item details.
- You can export the report to an Excel worksheet, a comma-separated values (CSV) file, or a PDF file, by clicking the Excel Export, CSV Export, or PDF Export button at the bottom of the report.
Travel Based Expense Behavior
Choose this report for a travel spending summary, with a breakdown of how many expense reports include flights, hotels, and car rentals:
- To set the dates for the report, click the calendar icons for the Start Date and End Date. Click Refresh to refresh the report dates and view the report.
- You can export the report to an Excel worksheet, a comma-separated values (CSV) file, or a PDF file, by clicking the Excel Export, CSV Export, or PDF Export button at the bottom of the report.
Attendee Report
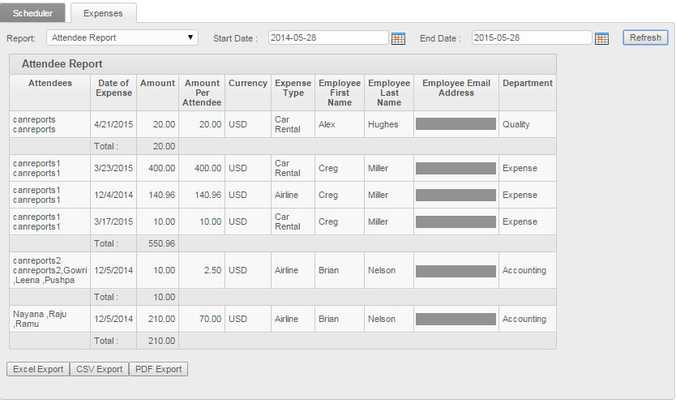
Choose this report for a summary of attendees with the amount per attendee and expense type. To set the dates for the report, click the calendar icons for the Start Date and End Date. Click Refresh to refresh the report dates and view the report.
Top Expensers
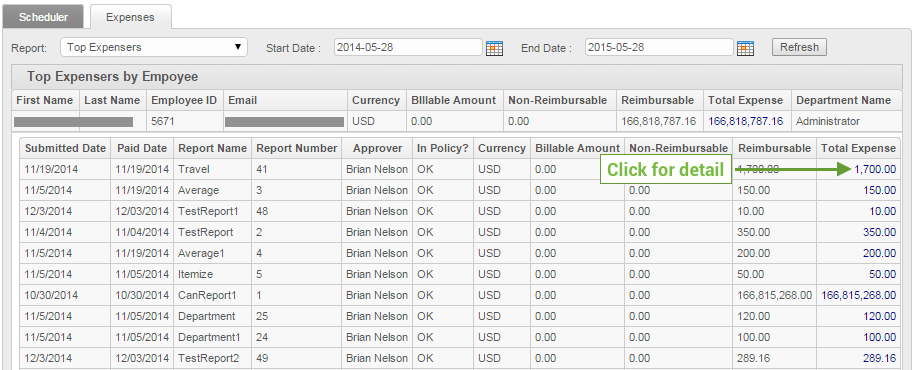
Choose this report for the top expense report submitters in descending order:
- To set the dates for the report, click the calendar icons for the Start Date and End Date. Click Refresh to refresh the report dates and view the report.
- To see an employee's reports, click the amount link in the Total Expense column. You can then click the amount in the Total Expense column for each report to see line item details:
- You can export the report to an Excel worksheet, a comma-separated values (CSV) file, or a PDF file, by clicking the Excel Export, CSV Export, or PDF Export button at the bottom of the report.
Report Samples
See Report Samples to review samples of reports.


