Uploading User Profiles and Delegates
- IT Info
- Malissa Olofernes (Unlicensed)
Analytics
As a site administrator, you can update or add multiple users to your site at once. You can also upload user-delegate relationships (for a description of delegates, see Editing a User Profile and Setting Delegates). You can use the templates provided in the Partner Dashboard, and upload the file.
Tip: You can make configuration changes to profile fields as they are used on the site. See Profile Field Settings for details.
Downloading and Using the Template
To use the template and prepare the upload file, follow these steps:
- After clicking the Profiles tab, and click the Download Templates link. The Download Templates page appears.
- In the User Profile Upload or User Delegate Upload section of the page, click the link for the type of template you want to use:
User Profile Upload:- Download Template with Instructions (Excel): Click this link (at the bottom of the Profile Upload section) if you are unfamiliar with user profile uploading. It contains instructions as well as the rows and columns in a Microsoft Excel file. After editing the rows and columns, you can save the file as a comma-separated values (CSV) file.
Note: We strongly recommend using Excel to save the template as a worksheet file first, and then editing the worksheet file, before saving the worksheet as a CSV file. Avoid using Excel to open a CSV file, as date formats may change, and numeric values may be truncated and their leading zeros removed. - Download CSV template: Click this for a comma-separated values (CSV) file, assuming you already know how to format it.
Note: We strongly recommend using a text editor (such as Textpad or Notepad) or a CSV file editor (such as CSVed) to manipulate data in a CSV file. Avoid using Excel to open a CSV file, as date formats may change, and numeric values may be truncated and their leading zeros removed. - Download XML template: Click this for an XML file. If you are using XML, you should also click the Download XML Schema Definition (XSD) link.
- Download CSV template: Click this for a comma-separated values (CSV) file.
Note: We strongly recommend using a text editor (such as Textpad or Notepad) or a CSV file editor (such as CSVed) to manipulate data in a CSV file. Avoid using Excel to open a CSV file, as date formats may change, and numeric values may be truncated and their leading zeros removed. - Download XML template: Click this for an XML file.
- Download Template with Instructions (Excel): Click this link (at the bottom of the Profile Upload section) if you are unfamiliar with user profile uploading. It contains instructions as well as the rows and columns in a Microsoft Excel file. After editing the rows and columns, you can save the file as a comma-separated values (CSV) file.
- After the file is downloaded, open the file.
- Follow the instructions in Preparing a Profile or Delegate Upload File to prepare the file for uploading.
Scheduling the Upload
To schedule the upload, follow these steps:
- Click the Schedule Profile Upload link under the Profiles tab. The Schedule Profile Upload page appears.
- Choose Now in the Schedule dropdown menu to upload the file immediately, or choose one of the following:
- Once, on...: Choose for a one-time upload, and specify the start date and time in the Start Date and Time dropdown menus.
- Daily: Choose for a daily upload, specify the start date and time in the Start Date and Time dropdown menus, and choose one of the following for the Duration option:
- No end date.
- Through end date: specify the end date in the End date dropdown menu.
- Specify number of occurrences: Enter the number of occurrences.
- Periodic: Choose for a periodic upload, specify the start date and time in the Start Date and Time dropdown menus, specify how many hours and minutes to repeat the update process and how many times to repeat the process, and choose one of the following for the Duration option:
- No end date.
- Through end date: specify the end date in the End date dropdown menu.
- Specify number of occurrences: Enter the number of occurrences.
- Weekly or Bi-Weekly: Choose for a weekly or bi-weekly upload, click the "Occurs on" checkboxes for one or more days, specify the start date and time in the Start Date and Time dropdown menus, and choose one of the following for the Duration option:
- No end date.
- Through end date: specify the end date in the End date dropdown menu.
- Specify number of occurrences: Enter the number of occurrences.
- Monthly: Choose for a monthly upload, choose a month in the Start Month dropdown menu, choose the day of the month in the Occurs On (Day Of Month) dropdown menu, specify the time in the Time dropdown menu, and choose one of the following for the Duration option:
- No end date.
- Through end date: specify the end date in the End date dropdown menu.
- Specify number of occurrences: Enter the number of occurrences.
- In the Job Options section, enter a name for the job in Job Description and an email address to identify where the Job Completion Email will be sent.
- In the File Options section, choose one of the following for File Source:
- Upload from local file: Click this radio button to upload the file from your computer, and follow these steps:

- Click one of the following radio buttons for File Format:
- CSV: Comma-separated values (CSV) file.
- XML: Extensible Markup Language file.
- Click the Choose File button to navigate to and select the file.
- Click one of the following radio buttons for File Format:
- Upload from Sftp server: Click this radio button to upload the file from your SFTP server, and follow these steps:

- Click one of the following radio buttons for File Format:
- CSV: Comma-separated values (CSV) file.
- XML: Extensible Markup Language file.
- Choose the server from the Secure Ftp dropdown menu (such as SFTP Server 1).
Note: This is the server account for access to the vault, which the site administrator assigns under the Settings tab as described in FTP Servers. - Enter the path, if necessary, to the folder in the "Remote File / File Name Pattern" field. For example, data/ for the path to the "data" folder.
Tip: You can use this field to also specific a filename. You can use a file name pattern with a path, such as data/acme_$yyyy$mm$dd.csv to specify the filename. A preview of the filename appears below the field (the above filename would be acme_20150914.csv for an upload on Sept. 14, 2015.
Note: For more information about setting up an SFTP server account, see Setting Up SFTP Data Transfers.
- Click one of the following radio buttons for File Format:
- Upload from local file: Click this radio button to upload the file from your computer, and follow these steps:
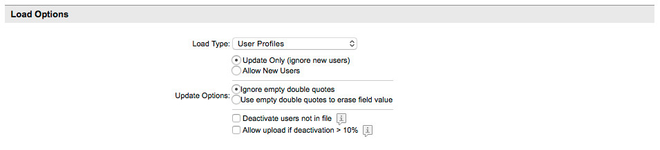
- Choose one of the following from the Load Type dropdown menu in the Load Options section:
- User-Delegate Relationships: The type of upload will replace all existing user-delegate relationships.
Warning: Any delegate not specified in the file will be removed. - User Profiles: Follow these steps for a user profile upload:
- Select one of the following under the Load Type dropdown menu:
- Click the "Allow New Users" radio button to add both existing and new users.
- Click the "Update Only (ignore new users)" radio button if the file contains only existing users.
- Update Options: Choose one of the following:
- Ignore empty double quotes: Click this radio button to ignore empty fields delimited by double quotes
- Use empty quotes to erase field value: Click this radio button to use empty fields to update field values in the profile to be blank.
- Under the Update Options section, choose the following or leave unchecked:
- If you intend this upload file to include everyone you want to be active on the site, and no one else, click the "Deactivate users not in file" checkbox. This deactivates users who are not included in this upload.
Warning: This will deactivate all user profiles on the site that are not included in this upload file. If you click this checkbox without intending this to happen, and also click the "Allow upload if deactivation > 10%" checkbox, it could be disastrous for your site. - If you really intend to deactivate more than 10 percent of the users on your site with this profile upload, you can click the "Allow upload if deactivation > 10%" checkbox. This turns off detection of an unintentional mass deactivation.
Warning: This will turn off detection of unintentional deactivations greater than 10 percent of the users in the upload file. If you click this checkbox and also click the "Deactivate users not in file" checkbox, it could be disastrous for your site, as the combination deactivates users who are not included in this upload.
- If you intend this upload file to include everyone you want to be active on the site, and no one else, click the "Deactivate users not in file" checkbox. This deactivates users who are not included in this upload.
- Select one of the following under the Load Type dropdown menu:
- User-Delegate Relationships: The type of upload will replace all existing user-delegate relationships.
- Click Submit to upload the file.
Note: The upload file is moved from the Deem external directory to an internal data directory one hour after receipt. From this internal directory, the scheduler uploads the data into the site. The file must be uploaded the same day received (PST) when a recurring file is being scheduled.
Warning: If errors occur in the upload file or upload process, the error may prevent the uploading of one user or the entire file of users, depending on the type of error.
Viewing Upload Schedules
To look at scheduled profile upload jobs, follow these steps:
- Click the Profile Upload Schedules link under the Profiles tab. The Schedules page appears.
- Choose User Profile or User-Delegate Relationships from the Upload Type dropdown menu. A list of schedules appears.
- You can filter the list by choosing the schedule from the Schedule dropdown menu, and choosing the state (Active, Cancelled, or Expired) from the State dropdown menu.
- Click Done to finish.