Creating Reference Points
- IT Info
- Malissa Olofernes (Unlicensed)
- Becca Cook (Unlicensed)
This topic describes adding or editing reference points on the Reference Point Sets page.
Overview
As an administrator, you can create reference points, which are locations close to a user's destination that appear as search options. Reference points help users search for common locations more quickly and efficiently.
To create reference points, you upload a comma-separated values (CSV) file that contains the reference point information about multiple locations. You can define multiple reference point sets, each of which contains a reference point file that includes the individual reference points. Deem validates reference points to ensure that the data is complete and usable by the system before accepting them. Reference points are stored with longitude and latitude coordinates in addition to address.
The CSV file looks like this in Microsoft Excel:

The CSV file looks like this in a text editor:

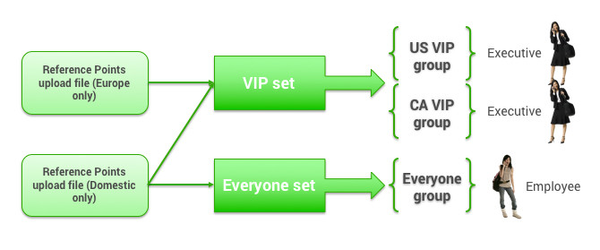
In order to have different reference points for different groups of users, you upload a reference point file into a set that can be assigned to one or more groups. For example, if you have separate reference points files for Europe and Domestic (US), you can assign the Europe reference points (along with the Domestic reference points) to VIPs, but assign only the Domestic reference points to everyone.
Tip: For a description of groups, see Groups Tab for Managing Groups.
Navigating to the Reference Point Sets Page
To view and change the reference point sets, follow these steps:
- Click the Services tab.
- Click the Reference Points link. The Reference Point Sets page appears.
Tip: You can also add or change reference point sets by choosing a specific group's set first. Click the Add/Edit Reference Points link on the Rules page for the group (as described in Enabling Travel Rules). The Reference Point Sets page appears.
Uploading a Reference Point File for a Set
On the Reference Point Sets page, you can either upload a new reference point file from scratch (using a template) for a set, or download the existing reference point file for a set and replace it entirely with a new upload file. Any errors in the file will be reported back to you. If there are errors, the file will not be stored the system until you correct them and re-upload the file.
Starting with a New Reference Point File
To upload a new reference point file from scratch, follow these steps:
- Click Add A New Reference Point Set to upload a new set of reference points. The Add page appears.
- Click the Sample Reference Point Template link to download the reference point template.
- Open the template in Microsoft Excel or another program that can edit comma-separated values (CSV) files.
- Save the edited template as a ".csv" (comma-separated value) file by choosing File > Save As. Be sure to select CSV (Comma delimited ) (*.csv) in the Save as type dropdown menu.
- Enter a name for the reference point set in the Set Name field.
- Click the Choose File button, and browse for and select the newly saved ".csv" file.
- Click the Upload File and Save button.
Using an Existing Reference Point File
If you want to preserve the reference points you already have uploaded for a set, follow these steps:
- Click the name link in the Set Name column to upload a file to replace an existing set. The Edit page appears.
- Click the Download link at the bottom of the page, next to "Download Existing Preference Points File (in CSV format)".
- Open the file in Microsoft Excel or another program that can edit comma-separated values (CSV) files.
- Save the edited file as a ".csv" (comma-separated value) file by choosing File > Save As. Be sure to select CSV (Comma delimited ) (*.csv) in the Save as type dropdown menu.
- (Optional) Edit the name for the reference point set in the Set Name field.
- Click the Choose File button, and browse for and select the newly saved ".csv" file.
- Click the Upload File and Save button.
The contents of the file will replace all existing reference points for that set.
After saving a reference point set, you can assign the set to one or more groups. See Enabling Travel Rules for instructions.
Note: To commit all of your changes, click the changes not applied link at the top of the page. The Commit Changes page appears. Click the Commit button.