Hotel Chain Vendor Preferences
- Former user (Deleted)
- Kavita Pillai
- IT Info
- Becca Cook (Unlicensed)
This topic describes adding or editing a vendor preference on the Add or Edit page.
Overview
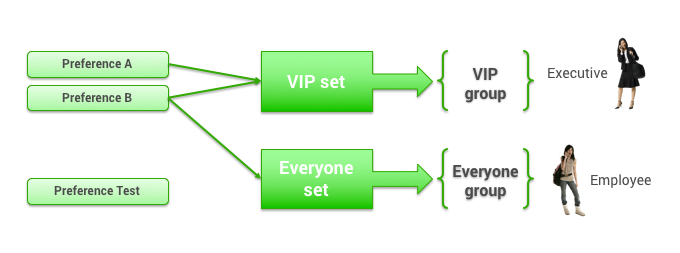
You create or edit each preference, and then organize the preferences into sets that can be assigned to groups. You can add the same preference to more than one set.
Navigating to the Add or Edit Page
To add new preferences, or view and change preferences, follow these steps:
- Click the Services tab.
- Click the Vendors link. The Vendor Management page appears.
- Click Hotel Chain Preferences in the Vendor Preferences section. The Hotel Chain Preferences page appears.
- Click the Add A New Hotel Chain Preference link to add a new preference, or click an existing preference name in the Name column to edit that preference. The Add or Edit page appears, showing the sections below (starting with "General Settings").
Tip: You can view and change hotel chain vendor preference sets for a group, and edit existing preferences, by following these steps:
- Click the Add/Edit Hotel Sets link on the Rules page for the group (as described in Enabling Travel Rules). The Hotel Chain Preference Sets page appears.
- Choose one of the following:
- To add a new set, see "Adding a New Preference Set" in this topic for further instructions.
- To view or edit an existing set, click the set name in the Preference Set Name column. The set's Edit page appears with a list of hotel preferences.
- Click an existing preference name in the Name column to edit that preference. The preference Edit page appears, showing the sections below (starting with "General Settings").
General Settings
- In the General Settings section, click the Activate Preference checkbox to activate the preference.
- Enter or edit the name for the hotel chain preference to help recognize the area to which it applies. An example is "DFW Hotel" to show that this hotel preference is for the Dallas/Ft. Worth area.
- Preference Start Date: If the preference shouldn't take effect immediately, select the starting Month, Day and Year from the dropdown lists, or click the calendar icon and make the selection on the calendar.
- Preference End Date: If the preference has an anticipated end date, select the Month, Day and Year from the dropdown lists, or click the calendar icon and make the selection on the calendar.
Location Preferences
Choose one of the following location preference settings:
- Apply globally (regardless of location): Click this radio button if the preference applies to all locations.
- Apply to specific locations: Click this radio button if the preference applies to a specified location. Set the location as follows:
- Location: Choose one of the following:
- By airport codes: Enter the airport codes separated by semicolons.
- By states: Choose one or more states from the dropdown list. Hold down Control (CTRL) to make multiple selections.
- By countries: Choose the one or more countries from the dropdown list. Hold down Control (CTRL) to make multiple selections.
- Anywhere: Any location.
- Location: Choose one of the following:
Preferred Hotel Chains
Follow these steps to enter the preferred hotel chains for the location preference setting:
- Most Preferred Hotel Chain: Enter the hotel chain codes separated by commas for most preferred, which appear at the top of the search results page.
- Highly Preferred Hotel Chain: Enter the hotel chain codes separated by commas for highly preferred, which appear under the most preferred hotels at the top of the search results page.
- Preferred Hotel Chain: Enter the hotel chain codes separated by commas for preferred, which appear under the highly preferred hotels at the top of the search results page.
- Flag the Preferred Hotels as Preferred? Choose Yes to display search results as outlined above (most preferred followed by highly preferred and then preferred), but also with a gold icon or medallion with a "P" beside the information. The user can hover over the "P" to see the codes "PPP" for most preferred, "PP" for highly preferred, or "P" for preferred.
Restricted Hotel Chains
Follow these steps to enter the restricted hotel chains for the location preference setting:
- Hotel chains to be excluded: Enter the hotel chain codes separated by commas to be excluded. Excluded hotels don't appear in search results even if they meet the trip search criteria.
- Hotel chains to be displayed last: Enter the hotel chain codes separated by commas for hotels that should appear at the bottom of the search results. These hotels appear last even if they would otherwise appear higher on the list.
- Hotel chains to be displayed after similar hotels: Enter the hotel chain codes separated by commas for hotels that should appear along with other hotels if the results are similar.
- Remove logo of restricted hotels: Choose Yes to remove the logo of a restricted hotel next to the search results for that hotel, or No.
- Remove pictures and video of restricted hotels: Choose Yes to remove the pictures and video of a restricted hotel.
Saving the Preference
Click the Save button to save the new hotel chain preference. The Hotel Chain Preferences page appears. You can then add another new car rental preference by clicking Add a New Hotel Chain Preference and following the above steps.
You need to add the preference to a set in order to assign it to a group. To add the preference to an existing set, see "Adding a Preference to an Existing Set" in this topic. To add a new set, see "Adding a New Preference Set".
Tip: For a description of groups, see Groups Tab for Managing Groups.
Adding a Preference to an Existing Set
To add a preference to an existing set, follow these steps:
- Click an existing set name in the Preference Set Name column. The Edit page appears.
- Edit the name in the Preference Set Name field. This name should be easily recognizable as a specific preference set.
- Click the Add Preference button. The Search & Add Preference page appears.
- Select a preference list to add to the set by clicking its radio button.
- Click OK & Add Another to add another list to the set, and repeat the previous step and this step until you've added all of the lists for the set.
- After making the final selection, click OK to finish adding to the set.
- Click Save to save your changes.
Note: To commit all of your changes after saving them, click the changes not applied link at the top of the page. The Commit Changes page appears. Click the Commit button.
Adding a New Preference Set
If you arrived at the Hotel Chain Preferences page by navigating from the Services tab, follow these steps:
- Click Back to Vendor Management at the top of the Hotel Chain Preferences page. The Vendor Management page appears.
- Click the Hotel Chain Preference Sets link. The Hotel Chain Preference Sets page appears.
- Click the Add A New Hotel Chain Preference Set link to add a new set. The Add page appears.
If you arrived at the Hotel Chain Preferences page by navigating from the Rules tab, Click the Add A New Hotel Chain Preference Set link to add a new set. The Add page appears.
Follow these steps to add the new preference set:
- Enter a name in the Preference Set Name field. This name should be easily recognizable as a specific preference set.
- Click the Add Preference button. The Search & Add Preference page appears.
- Select a preference list to add to the set by clicking its radio button.
- Click OK & Add Another to add another list to the set, and repeat the previous step and this step until you've added all of the lists for the set.
- After making the final selection, click OK to finish adding to the set.
- Click Save to save your changes.
Note: To commit all of your changes after saving them, click the changes not applied link at the top of the page. The Commit Changes page appears. Click the Commit button.