Configuring Restricted Countries
- IT Info
- Kavita Pillai
- Becca Cook (Unlicensed)
As an administrator, you can define countries that are restricted for travel. You can disallow travel to restricted countries, or just display a warning.
You create or edit a list of restricted countries as a configuration. You can set up multiple configurations if needed, but typically you would assign a single configuration of restricted countries to sets for all groups.
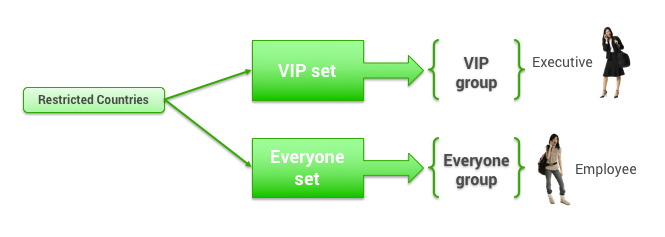
Note: Any group that does not have a restricted countries set assigned would have no restrictions. In the above figure, if you don't assign the set to a group (for example, if you remove the arrow from Restricted Countries to VIP set), the group would have no restrictions for traveling to those countries.
Adding a New List or Changing All Existing Configurations
To add new restricted countries, or view and change all configurations of restricted countries, follow these steps:
- Click the Services tab.
- Click the Restricted Countries link. The Restricted Countries Configuration Management page appears.
- Click the Restricted Countries Configuration List link. The Restricted Countries Configuration List page appears.
- Click the Add Restricted Countries Configuration link to add a new configuration, or click the name link in the Restricted Countries Name column to edit an existing configuration. The Add or Edit page appears with the configuration name field and a list building tool.
Viewing or Changing Existing Configurations for a Group
You can view and change restricted countries configuration sets for a group, and edit existing sets, by following these steps:
- Click the Add/Edit Restricted Countries Sets link on the Rules page for the group (as described in Enabling Travel Rules). The Restricted Countries Configuration Sets page appears.
- Choose one of the following:
- To add a new set, see "Adding a New Set" in this topic for further instructions.
- To view or edit an existing set, click the set name in the Set Name column. The set's Edit page appears with a list of configurations for restricted countries.
- Click an existing restricted countries configuration name in the Restricted Countries Name column to edit that configuration. The Restricted Countries page appears with the configuration name field and a list building tool.
Building a List of Restricted Countries
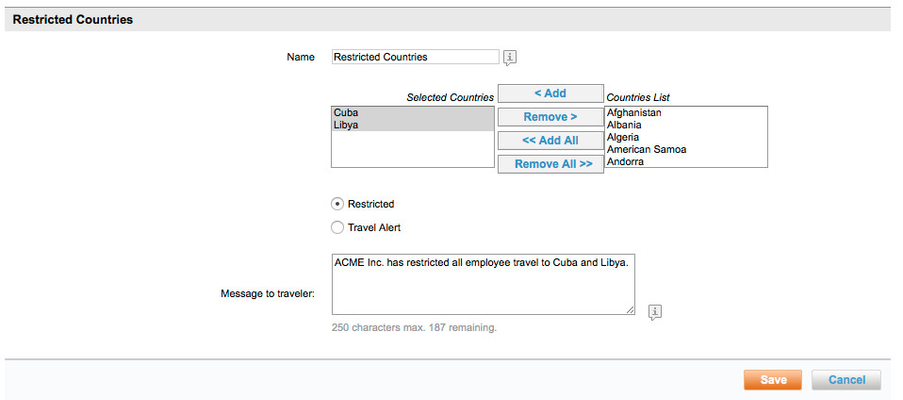
- Enter or edit the name in the Name field for the restricted countries configuration to help recognize it in a dropdown list.
- Select countries from the Countries List box on the right, and click the Add button to add them to the Selected Countries box on the left. Select more than one country by holding the Control (CTRL) key.
- Tip: Click Add All to add all of the countries. You can then remove one or more countries by selecting them in the Selected Countries box, and clicking the Remove button.
- Choose one of the following:
- Restricted: Click this option to not allow travel at all to the countries selected above.
- Travel Alert: Click this option to show an alert message to users.
- Message to traveler: Enter a message to appear to the user if the user chooses one of the restricted countries as a destination.
- Click Save to save the configuration.
You need to add the configuration to a set in order to assign it to a group. To add the configuration to an existing set, see "Adding a List to an Existing Set" in this topic. To add a new set, see "Adding a New Set".
Tip: For a description of groups, see Groups Tab for Managing Groups.
Adding a List to an Existing Set
To add a configuration to an existing set, follow these steps:
- Click an existing set name in the Set Name column. The Edit page appears.
- Edit the name in the Restricted Countries Name field. This name should be easily recognizable as a restricted countries configuration set in a dropdown menu.
- Click the Add Restricted Countries button. The Search & Add to Set page appears.
- Select a restricted countries list to add to the set by clicking its radio button.
- Click OK & Add Another to add another list to the set, and repeat the previous step and this step until you've added all of the lists for the set.
- After making the final selection, click OK to finish adding to the set.
- Click Save to save your changes.
Note: To commit all of your changes after saving them, click the changes not applied link at the top of the page. The Commit Changes page appears. Click the Commit button.
Adding a New Set
If you arrived at the Restricted Countries Configuration List page by navigating from the Services tab, follow these steps:
- Click Back to Restricted Countries Configuration Management at the top of the Restricted Countries Configuration List page. The Restricted Countries Configuration Management page appears.
- Click the Restricted Countries Configuration Sets link. The Restricted Countries Configuration Sets page appears.
- Click the Add Restricted Countries Configuration Set link to add a new set, or click an existing set name in the Set Name column to edit that set. The Add or Edit page appears.
If you arrived at the Restricted Countries Configuration Sets page by navigating from the Rules tab, click the Add Restricted Countries Configuration Set link to add a new set. The Add page appears.
Follow these steps to add the new preference set:
- Enter or edit the name in the Set Name field. This name should be easily recognizable in a dropdown menu.
- Click the Add Restricted Countries button. The Search & Add to Set page appears.
- Select a restricted countries list to add to the set by clicking its radio button.
- Click OK & Add Another to add another list to the set, and repeat the previous step and this step until you've added all of the lists for the set.
- After making the final selection, click OK to finish adding to the set.
- Click Save to save your changes.
Note: To commit all of your changes after saving them, click the changes not applied link at the top of the page. The Commit Changes page appears. Click the Commit button.