Open Enrollment
- Former user (Deleted)
- Kavita Pillai
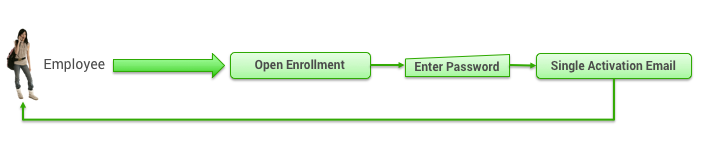
Open enrollment enables site visitors to create a new account, yet still maintain a secure site. The visitor accesses the sign-in page and clicks the Create a new account link. The visitor then creates an account with a password during the enrollment process, and enters basic information for the profile, including the first and last name and username. The new user then receives an activation email with the log-in link.
This option is typically used by companies that don't have or don't want to set up an ongoing human resources (HR) feed for new user registration. Other options include creating users manually and sending them emails to join the site, or uploading user profiles – see Managing and Supporting Site Users for an overview.
As an administrator, you can keep the site secure by requiring the visitor to enter a specific word or phrase as a secret key, or setting up the site to match the user's email address against a list of approved domains. If the secret key is provided, or the email address matches an approved domain, an activation email including a link to the site is sent to the user’s email address.
Note: The user can change the password and add or edit profile information at any time by clicking the user name link to access the profile. As an administrator, you can also perform all these actions in the Dashboard. See Editing a User Profile and Setting Delegates for details.
Understanding Open Enrollment Security
Warning: As an administrator, you must limit open enrollment access using one of the following security measures:
Restrict by email address: The visitor must have an email address whose domain matches one of the allowed domains in order to begin the enrollment process. You would list only the domain names you trust. Visitors with addresses on publicly available web-based email domains, such as Gmail, Hotmail, or Yahoo!, would not be able to enroll using that email address.
Restrict by secret key: The visitor must enter the secret word or phrase to begin the enrollment process.
Note: When using a secret key, you need to frequently change the key and use different secret keys for each site that uses open enrollment. You should perform regular searches for the site’s URL to review what pages appear. Ensure that the secret key does not appear on any page outside the agency firewall.
If you enable both measures, visitors not only need to have an appropriate email address that matches one of the domains, but also need to enter the secret word or phrase.
If the enrollment process is successful, an activation email including a link to the site is sent to the user’s email address.
Configuring Open Enrollment
Note: Open enrollment is not cloned as enabled when a site has been cloned from a template site. You must enable open enrollment for each new site, if appropriate.
To configure open enrollment, follow these steps:
- Click the Settings tab, and then click Open Enrollment. The Settings | Open Enrollment page appears.
- Click the Enable Open Enrollment checkbox to enable open enrollment.
- Follow the steps for each section of the Open Enrollment page:
Restriction Criteria
Scroll down to the Restriction Criteria section of the page, and choose one or both of the following:
- Restrict by email address: Click this checkbox to restrict self-enrollment to users who enter an email address which includes the email domain names listed in the "Allowed domains" text box. You can enter to 500 characters (including commas to separate domains) in the box.
Warning: With this option, open enrollment access is limited to users whose email domain name is included in the list of email domain names listed on this page. - Restrict by secret key: Click this checkbox to restrict self-enrollment to users who enter the word or phrase listed in the Secret Key (alphanumeric) text box. You also need to enter the label that appears asking the user to enter the secret key.
Note: You can restrict using both email domain name and secret key by selecting both checkboxes.
Success Message and Form Headers
Scroll down to the Open Enrollment Success Message section of the page, and follow these steps:
- Open Enrollment Success Message: Enter the text to appear to the user after successfully enrolling. Use plain text without travel lingo or HTML tags.
- Open Enrollment Form Headers: Enter the general information and password text that will appear as headers on the open enrollment email in HTML format. This information is typically pre-populated from the site template.
Email Notifications and Activation
Scroll down to the Open Enrollment Email Notifications section of the page, and follow these steps:
- Successful enrollment email notification list: Enter a list of email addresses (separated by commas) to receive successful enrollment notifications. It is a best practice to enter at least one email address to monitor the open enrollment process.
- Failed enrollment email notification list: Enter a list of email addresses (separated by commas) to receive failed enrollment notifications. It is a best practice to enter at least one email address to monitor the open enrollment process.
- Open Enrollment User Activation Email Definition (HTML / Text): Enter the text for the email a user will receive after open enrollment. This applies to users who have self-enrolled, not those who are a part of a user profile load.
Tip: To send a preview of the email to an email address, click Preview Registration Email, and then enter one or more email addresses separated by commas or semicolons. - Success / Failure Open Enrollment Admin Email Notifications (HTML / Text): Enter the HTML or plain text for the email an administrator will receive after success or failure of an open enrollment.
- Click Save at the bottom of the page.
Note: To commit all of your changes after saving them, click the changes not applied link at the top of the page. The Commit Changes page appears. Click the Commit button.
To learn about other methods of adding users, and how to manage users, see Managing and Supporting Site Users.