Enabling Site Payment Cards
- IT Info
- Kavita Pillai
- Becca Cook (Unlicensed)
This topic describes enabling site payment cards on the Add or Edit page.
Overview
Site cards are generally used to charge all centrally-invoiced or charged transactions. Site cards are created and managed by site administrators.
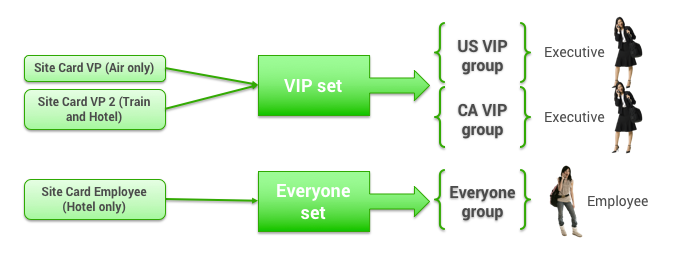
You can restrict a site payment card to be used only for air, train, or hotel. In order to have different site payment cards with different restrictions for different groups of users, you create or edit each site card list, and then organize the card lists into sets that can be assigned to groups. You can add the same card list to more than one set.
Tip: For a description of groups, see Groups Tab for Managing Groups.
Navigating to the Add or Edit Page
To add new site payment card lists, or view and change site payment card lists, follow these steps:
- Click the Services tab.
- Click the Site Payment Cards link. The Site Payment Cards Management page appears.
- Click the Site Payment Cards List link. The Site Payment Cards List page appears.
- Click Add a new site payment card to add a new card, or click the Card Name link for an existing card. The Add or Edit page appears, showing the "Site Payment Card Definition" section heading.
Tip: You can view and change site card sets for a group, and edit existing site cards, by following these steps:
- Click the Add/Edit Site Payment Card Sets link on the Rules page for the group (as described in Enabling Travel Rules). The Site Payment Cards Sets page appears.
- Choose one of the following:
- To add a new set, see "Adding a New Site Payment Card Set" in this topic for further instructions.
- To view or edit an existing set, click the set name link in the Set Name column. The set's Edit page appears with a list of payment cards.
- Click an existing card list name in the Card Name column to edit the site card. The Edit page appears with the "Site Payment Card Definition" section heading.
Entering or Editing a Site Payment Card
In the "Site Payment Card Definition" section of the Edit or Add page, follow these steps:
- Activate Code: Select the checkbox to activate the code.
- Card Name: Enter a name for this card.
- Card Type: Select a card type from the dropdown menu.
- Card Number: Enter the card number
- Expiration Date: Select the card’s expiration date from the month and year dropdown menus.
- Restricted: Click the Yes radio button to specify that this card is restricted, or click the No radio button.
- For Air: Click the Yes radio button to specify that this card will be used for air purchases, or click the No radio button.
- For Hotel: Click the Yes radio button to specify that this card will be used for hotel purchases, or click the No radio button.
- For Rail: Click the Yes radio button to specify that this card will be used for rail purchases, or click the No radio button.
- Need Billing Address: Choose one of the following:
- Click the No radio button if the billing address will not be required.
- Click the Yes radio button if a billing address will be required when using this card for payment. If you choose Yes, the Billing Address section appears below this option. Enter the entire billing address in this section.
Note: The Billing Address is required by Southwest if this card will be used for a Southwest Direct Access purchase.
- Click Save at the bottom of the page to save your changes.
To add more site payment cards to this list, click Add a new site payment card and repeat the above steps.
You need to add the site payment card list to a set in order to assign it to a group. To add the list to an existing set, see "Adding a Site Payment Card List to an Existing Set" in this topic. To add a new set, see "Adding a New Site Payment Card Set".
Adding a Site Payment Card List to an Existing Set
To add a site payment card list to an existing set, follow these steps:
- Click an existing set name in the Set Name column. The Edit page appears.
- Edit the name in the Set Name field. This name should be easily recognizable as a specific set. An example is "Card for Air Only".
- Click the Add Card button. The Add Card To Set page appears.
- Select a site payment card list to add to the set by clicking its radio button.
- Click OK & Add Another to add another list to the set, and repeat the previous step and this step until you've added all of the lists for the set.
- After making the final selection, click OK to finish adding to the set.
- Click Save to save your changes.
Note: To commit all of your changes after saving them, click the changes not applied link at the top of the page. The Commit Changes page appears. Click the Commit button.
Adding a New Site Payment Card Set
If you arrived at the Site Payment Cards List page by navigating from the Services tab, follow these steps:
- Click Back to Site Payment Cards Management at the top of the Site Payment Cards List page. The Site Payment Cards Management page appears.
- Click the Site Payment Cards Sets link. The Site Payment Cards Sets page appears.
- Click the Add a new site payment card set link to add a new set. The Add page appears.
If you arrived at the Site Payment Cards Sets page by navigating from the Rules tab, Click the Add a new site payment card set link to add a new set. The Add page appears.
Follow these steps to add the new set:
- Edit the name in the Set Name field. This name should be easily recognizable as a specific set. An example is "Card for Air Only".
- Click the Add Card button. The Add Card To Set page appears.
- Select a site payment card list to add to the set by clicking its radio button.
- Click OK & Add Another to add another list to the set, and repeat the previous step and this step until you've added all of the lists for the set.
- After making the final selection, click OK to finish adding to the set.
- Click Save to save your changes.
Note: To commit all of your changes after saving them, click the changes not applied link at the top of the page. The Commit Changes page appears. Click the Commit button.