Entering A Pick-up Address
- Click into the Pick-up address field to enter the pick up location:
- You have multiple choices for how to enter their pick-up address

- Address Book Icon: If a user clicks the address book icon, a module will pop up containing all of the locations the user has saved to their personal address book which is located at the profile level.

- Searching by Keywords: If a user has many saved addresses, they can search key words or letters using the search bar which generates a list of addresses based on previously entered information by the user.

- Viewing Company Saved Addresses: Users can also easily view their company's saved addresses by typing in the known nickname or naming convention for company office locations. In this case, users type "GS-A" and they will get a list of all of their company's office locations, starting with the letter A.

- Using the Go to Map Option: Users can also use the "Go to Map" option if they need help visualizing where their pick-up location will be.

- You have multiple choices for how to enter their pick-up address
Entering A Drop-off Location - for rides from point A to B without any stops/or wait times
- Click into the Drop-off address field and enter the street address, airport code, location name or select from the list that displays.
If drop-off address is unknown at the time of booking, driver needs to wait for the rider at a stop or stops are non-sequential, please review the " " section.- If drop-off (or pick-up) is at an Airport, start typing the airport name or the airport code. Be sure to select the location with the airport icon.

- When selecting a location with the airport icon, you'll be prompted to enter the Flight Date, Airline and Flight Number
- The application will validate the flight information and automatically set the Arrive by time to 90 minutes before domestic flight departure and 120 minutes before international flight departure.
- The application will also auto-calculate the Pick-up by time, based on the travel time estimated by Google from pick-up location to the airport.
- If you feel that an earlier pick-up time is needed, manually update that time and disregard the auto-calculated arrival time. The driver will arrive by the requested pick-up time.
- Click in the Passengers field to select the number of passengers from the drop down list.
- Once all the information has been entered, select the +Add Car Service option to search for another ride OR click the Continue button.
- If drop-off (or pick-up) is at an Airport, start typing the airport name or the airport code. Be sure to select the location with the airport icon.

Adding Stops
- Users can also add additional stops between their pick-up and drop-off locations (4 maximum). NOTE: If stop requires driver to wait while rider is in a meeting, be sure to also review the " " section.
- Click the +Add a stop link

- Enter the address for each stop. Note the original Pick-up by and Arrive by time calculations have now been increased by 10 minutes to accommodate the 2 stops.
If stop requires driver to wait while rider is in a meeting, be sure to also review the " " section.
- Click the +Add a stop link

Drive As Directed - Hourly Ride
When this option is selected, an additional field displays where you select the number of hours the car is needed from the drop down list. 

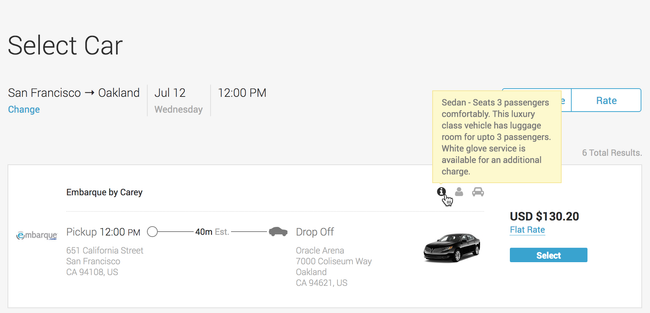
Selecting a Vehicle
Scroll through the car options that display to view the car details.
- Vehicle Type: Users can refine their search by clicking on the Vehicle Type button (Sedan, SUV, Van) or by clicking on the Rate button. (Rate, Provider, Capacity)


- Users can view the fare breakdown by hovering over the "Flat Rate" or "Hourly" blue link that appears below the price-

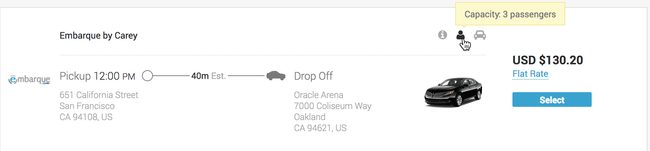
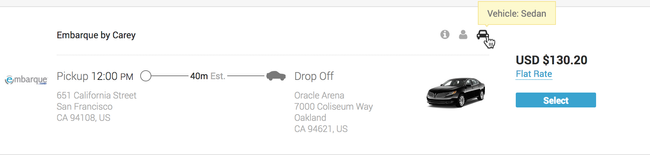
- Hover your pointer over the grayed out icons to display additional information about the vehicle.
- Car Info: This icon displays passenger and luggage information as well as additional options.
- Passenger Capacity: This icon displays how many passengers the car can seat comfortably.
- Vehicle Details: This icon displays the vehicle type.
- Car Info: This icon displays passenger and luggage information as well as additional options.
- Once you have found your car choice, click the Select button.