Cost Allocation vs Custom Fields
Cost Allocation allows for a TMC/Customer to either manually "upload" a file or set up an “Automated Feed.” Custom Fields do not allow for either
Cost Allocation configuration is 'limited' to only appear on the "Purchase Page" and “Trip Planner” page . Custom Fields may be displayed throughout the booking process
Cost Allocation and Custom Fields are both available on desktop or mobile
Cost Allocation Max file size is: 30MB. Custom Fields Max Character limitation is: Configuration (list type) option labels and values fields only allow the admin to enter 4000 characters max
Cost Allocation feeds can be automated for a one time set up fee. SOW required
Cost Allocation enablement requires a ZK property update. Enablement to be requested via a support ticket. No SOW required
Cost Allocation feature allows for nesting. Custom Fields do not offer nesting. Nesting allows the user to choose a "Parent Value" and in turn, presents the option for the "Child Value" nested under the “Parent”
Cost Allocation and Custom field data can be written to PNR scripts per the specs of the TMC/Customer
Protocol for TMC to request Cost Allocation
File a Support Ticket
Support forwards ticket to Travel Configuration Team
If Automation is requested, Configuration Manager sends request to Sales, so they can reach out to TMC/Customer to complete SOW
Once signed, Sales sends back to Configuration Manager, so they can attach to SFTP request
Field Configuration Information
Searchable Fields:
Allocation Name
Allocation Code
Search Results Displayed Fields:
Allocation Name
Template/Upload Fields: All headers must be present whether they are used or not (specifically for the last three)
Segment Name– Required - is configured in the UI
Allocation Name – Required - maximum length of 45 characters
Allocation Description – Not Required - maximum length of 180 characters
Allocation Code – Required if you want to capture a numeric value or string - maximum length of 35 characters
Parent Allocation Name – Required if Nesting one Allocation to another - Optional field unless you are using Nested field
Expense Approver ID - Not applicable for Travel
Expense Approval Threshold Amount - Not applicable for Travel
Travel Approval External ID – Not Required
Nested Fields:
In the case of a nested segment, the Parent Allocation name must exist/be configured, in order for it to upload successfully
Cost Allocation Template -CSV File Only
For Cost Allocation Template, please email travelcustomersuccess@deem.com for the template. (See below)
You can also export the template from the site configuration.

Validations: These are important when uploading cost allocations
File Header Validations:
File header is empty
File header has lesser number of fields than expected
File header names validation
Business Validations: Below are the list of business validations failure cases:
Ensure ALL columns and headers are included in the file - use the template, and ensure the headers are added correctly
Input Segment Name is not present in the system
Parent Segment not found in system for the input Parent Allocation name
Input Parent Allocation name is not present in the system
Linking active child allocation to inactive parent allocation
Parent allocation's segment is not the parent of the segment that owns the child allocation
Duplicate Allocation Names are NOT allowed
Cost Allocation – Field Limitations and Validations
Special Characters
Below is the list of special characters that are supported in Allocation Name, Allocation Code, and Segment Name: ~ ` ! @ # $ % ^ & * ( ) _ - + = { : ; } [ < , . > ] ? / " ' | \
Please Note: Following combination of special characters in allocation names causes issues in rendering the page: <? ">
Maximum File Size and Type
CSV file only file type accepted
Cost Allocation does not impose a ‘character limitation per se,’ however, only allows a maximum file size of 30MB
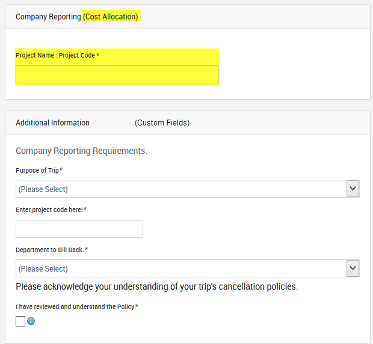
Cost Allocation – Desktop UI
Purchase Page Placement is directly above Custom Fields
Type-ahead feature to accommodate large files and long lists of data
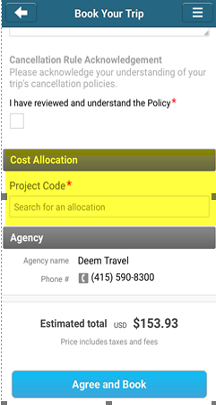
Cost Allocation – Mobile UI
Placement on the Purchase Page on Mobile – displays right after the Custom Fields
SOW Required for Automation
If a TMC/Customer needs "SFTP and Automated Feed," a SOW will need to be completed
If a TMC/Customer merely wants to enable the Cost Allocation to do 'random' manual uploads and only needs the cost allocation enabled on the particular site: No SOW, No Cost
How to Configure Cost Allocation Segments
Log into the Dashboard
Go to Services Tab
Under Expense > Click on General Settings > Under Configurations, click on Cost Allocation
There is a default Segment Name titled “Project” and it's inactive. You can use this field and "rename it" to the customer spec OR create a New Segment and Name
To Enable/Activate the "Project," click on the Edit link and check the "Active" box, and SAVE.
Once the Cost Segment Name is created, you are ready to create the Cost Allocation upload file. See Cost Allocation Template Sample with Data and FAQ for instructions
You can "Manually ADD" the elements to be included in the "dropdown/type ahead list," by Clicking the Add New Project button and entering the Allocation Name, Allocation Code and SAVE
Or you can prepare the template with the Allocation Names, Allocation Codes, and upload the file
Manual Upload: Complete the template with your data, save to your desktop, and Upload Allocations
Now are ready to Test: Impersonate a user, book a car, and when you get to the purchase page, verify that the Cost Allocation Project appears as per your upload.
Once you have completed testing, go back to the Cost Allocation Configuration > Edit the Project > Uncheck the Active box; OR you can merely go to Display Configurations, and set the Cost Allocation Integration, and set the enablement radio button to "No." This will prevent this option from being live.
Sample PNR Edits
Cost Allocation on Mobile
Appears on the Purchase Page ONLY
Nested Cost Allocations are supported