...
Table of Contents maxLevel 1
Selecting and Editing a User
To edit a profile, follow these steps:
- Click the Users tab in the Partner Dashboard. The Users | Overview page appears.
- Click the Edit a User link to edit a user's profile. The Users | Edit a User page appears.
- Enter search criteria as shown in the figure below. This can be a full or partial first name, full or partial last name, full or partial user name, email address, or employee ID. You can also refine your search by account type (End User, Support, or All), to include only users that were manually added, or to include only users that are active.
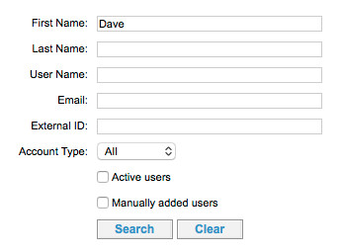
- Click Search. The Search Results section appears with a list of names:

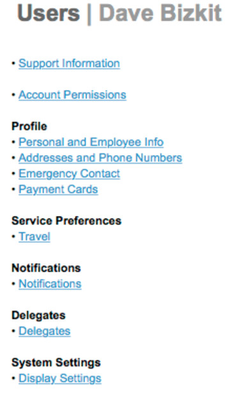
Click the name link in the Name column to show the user's profile. The right column of the profile shows the user's information (title, first name, last name, etc.). The left column provides links for viewing information and editing the profile:
Setting or Changing the User's Account Permissions
To set or change the user's account permissions (the account type and roles), click the following links in the left column:
...
- Account Type: Click one of the radio buttons for the account type:
- End User: This is the default selection for all users except support users.
- Support: A Support user's activity is not included in reports or statistics. A support account is usually a site administrator or someone who will perform testing or QA on a site and not be a traveler. If checked, this user will not appear in the reporting for the site and will not be overridden by a profile upload.
- Account Roles: Click all checkboxes that apply:
- Site Administrator: Click this checkbox if this user should have access to the Admin Access Dashboard, which includes analytics on spending for multiple service categories. For self-service sites, see Self-service Admin Access. For serviced sites, see Admin Access.
- Travel Approver Permission: This appears if pre-trip approval is configured for your site. Click this checkbox to give the user the ability to approve or decline trips. For details, see Setting Up Pre-Trip Approval.
- Shopping Approver Permission: This appears if Shopping is set up for your site. Click this checkbox to give the user the ability to be an approver in Shopping. For details on configuring Shopping, see Deem Shopping.
- Expense Approver Permission: This appears IF Expense is set up for your site. Follow these steps:
- Click this checkbox to give the user the ability to be an approver in Expense. The Expense Threshold Amount field appears.
- Enter the threshold amount for approval in the Expense Threshold Amount field.
Note: For details on configuring Expense, see Deem Expense.
- Payer Permission: This appears if Expense is set up for your site. Click this checkbox to give the user the ability to be a payer in Expense. To learn how to manage payers and assign them to groups, see Managing Payers and Payer Groups.
Editing Profile Information
To edit the user's information, click links in the left column as follows.
Personal and Employee Info and Approvers
Click Personal and Employee Info to view or edit the personal and employee information and set approvers for a user. The Employee Info page appears with fields that include the name, date of birth, and gender:
...
Note: Your site may have also custom fields on this page that require entries.
Contact Information and Payment Cards
Click the following links:
...
- Include the cardholder's name (as it appears on the card), the card type, and the card number and expiration date.
- Create a name for this card in the "Name this card" field. This name will appear in dropdown menus for selecting a payment card, making the card easy to select.
- Add the card's billing address.
- Set an alert to notify you of the card's expiration in the Expiration Alert section: Choose the number of months (such as 1 month before expiration), or Never, from the Display alert dropdown menu.
- Click the Save button to save your changes.
Adding Service Preferences
The Service Preferences section provides access to the user profile's service preferences.
Travel
To add or make changes to travel preferences, click the Travel link under the Service Preferences section of the left column of the Users | Edit a User page. The Travel Preferences page appears with separate sections for flight, hotel, and other service preferences.
Flight Preferences
In the Flight section, follow these steps:
- Add the home airport code (such as SFO for San Francisco) in the Home Airport field. You can click the Airport codes link to see the codes for airports.
- Click radio buttons for Seats, Default Search Type, and View Price Results By options.
- Choose options from the Preferred Fare Type and Meal dropdown menus.
- Select up to three special requests in the Airline Special Requests dropdown menus.
- In the Airline Memberships section, choose an airline membership from the Airline dropdown menu, enter the membership number in the Number field, and click Add. You can add multiple airline memberships.
- Click Save at the bottom of the Travel Preferences page to save your changes, or continue making changes in other sections.
Hotel Preferences
In the Hotel section, follow these steps:
- Select up to three amenities in the Hotel Amenities dropdown menus. In hotel search results, hotels with these amenities are highlighted.
- Select up to three special requests in the Hotel Special Requests dropdown menus.
- In the Hotel Memberships section, choose a hotel membership from the Hotel dropdown menu, enter the membership number in the Number field, and click Add. You can add multiple hotel memberships.
- Click Save at the bottom of the Travel Preferences page to save your changes, or continue making changes in other sections.
Rental Car Preferences
In the Rental Car section, follow these steps:
- Choose the typical rental car size for this user in the Default Car Size dropdown menu.
- Select up to three special requests in the Car Special Requests dropdown menus.
- In the Car Memberships section, choose a rental car membership from the Rental Car company dropdown menu, enter the membership number in the Number field, and click Add. You can add multiple rental car memberships.
- Click Save at the bottom of the Travel Preferences page to save your changes, or continue making changes in other sections.
Train Preferences
In the Train section, follow these steps:
- Enter the city or station code for the Home Train Station.
- Choose the user's preferred service class in the Preferred Service Class dropdown menu.
- Click the radio button for the One Way or Round Trip option for the Train Default Search Type.
- In the Membership Number section, choose a rail carrier from the Rail Carrier dropdown menu, enter the membership number in the Number field, and click Add. You can add multiple rail carrier memberships.
- Click Save at the bottom of the Travel Preferences page to save your changes, or continue making changes in other sections.
Car Service Preferences
In the Car Service section (which appears for users in groups that have Car Service enabled), follow these steps:
- In the "Default alias first name" and "Last name" fields, enter the name the user wants to appear on the sign that car service companies use for pickup in a public place (such as an airport). You can enter an alias for the name.
- Click the checkbox for "Show Car Service option after booking travel" if you want car service options to appear at the end of the user's booking process.
Travel and Additional Documents
You can add the user's passport or visa information in the Travel Documents section.
...
Note: To commit all of your changes, click the changes not applied link at the top of the page. The Commit Changes page appears. Click the Commit button.
Setting Notifications
To set notifications for the user, you must first impersonate the user, and then modify the user's notification preferences. To learn how to impersonate a user, see Impersonating a User. To learn about changing a user's notifications, see Your Profile – Notifications (for self-service sites) or Your Profile – Notifications (for serviced and enterprise sites).
Setting Delegates
A delegate is someone who can book travel or create expense reports for someone else. For example, an administrative assistant might be delegate for a manager, or a travel manager might be a delegate for a number of employees.
...
- To add a delegate for the user: Click Add a delegate in the People Who Can Book For Me section. The Add a Delegate page appears. Enter a name or email address in the Search field to search for the person who will act as the user's delegate. Click the radio button next to the person's name in the search results, and click the Select button. A confirmation email is automatically sent to both the user (confirming the user's delegate) and to the person you have set as the delegate for the user.
- To add the user as a delegate for someone else: Click Become a delegate in the People I Can Book For section. The Become a Delegate page appears. Enter a name or email address in the Search field to search for the person for whom the user will be a delegate. Click the radio button next to the person's name in the search results, and click the Select button. A confirmation email is automatically sent to both the user (confirming that the user is now a delegate) and to the person for whom the user will be a delegate.
- To delete a delegate: If you want to remove a delegate from the user's account, click the Edit button next to "Delegates". You can then click Delete to remove the delegate from the account.
Changing Display Settings
Click the Display Settings link in the System Settings section of the left column of the Users | Edit a User page to change the way the date, time, unit of measurement, language, and currency are displayed for this user. The Display Settings page appears.
...