Google Services Setup
- IT Info
- Kavita Pillai
- Becca Cook (Unlicensed)
Google Services integration setup is performed by the site administrator in the Partner Dashboard.
Overview
Note: If you previously set up Google Services integration, you may have to reconfigure Google’s Admin Console. Google Services integration for the enterprise has been upgraded to use the newest Google calendar features and application programming interface (API). As a result, you need to configure Google’s Admin Console to allow the new Google “OAuth2" token.
Tip: Trip modifications may not appear in the Google calendar for trips booked previously.
To enable enterprise groupware with Google Services, you must configure Google’s Admin Console to enable “OAuth2" token access. You then enable the groupware server and provide its settings by logging into the Partner Dashboard as the administrator, and choosing Desktop/SaaS Calendars as the server type.
Enabling Access
Follow these steps to configure Google’s Admin Console:
- Sign into the Google Admin Console (admin.google.com) as an administrator, and click Security.
- Click Show More, click Advanced Settings, and then click Manage API client access. The Manage API client access screen appears, as shown below, with your current configuration (shown as “deempartner.com”) at the bottom of the “Authorized API clients” section:
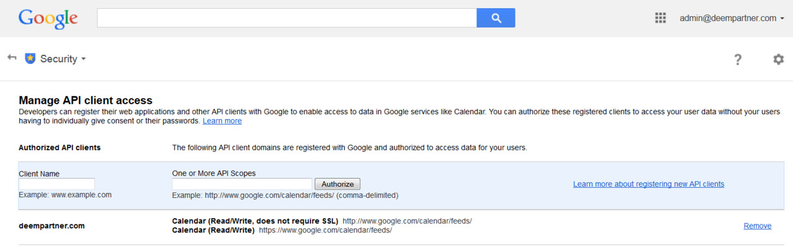
- Enter the following into the Client Name field of the “Authorized API clients” section (you can copy and paste the text):
875408307346-5ljvb30k7kilrchohjkivq8r6ebtttu0.apps.googleusercontent.com - Enter the following into the “One or More API Scopes field of the “Authorized API clients” section (you can copy and paste the text):
https://www.googleapis.com/auth/calendar - Click the Authorize button.
Your new configuration now appears below the previous configuration: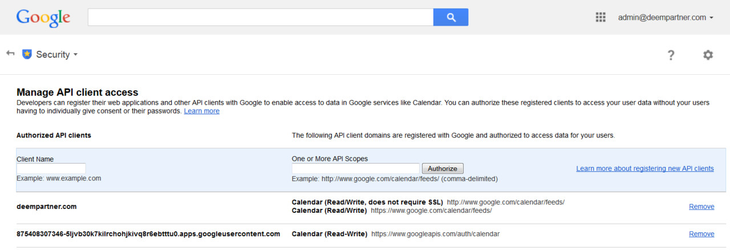
Enabling the Groupware Server in the Partner Dashboard
The Deem Activations team or your system administrator enables enterprise groupware in the Partner Dashboard by following these steps:
- Log into the Partner Dashboard as the site administrator.
- Click the Groupware Servers link under the Settings tab.
- Click the Add Server link to show the Add Server page and add a server, or click the link for an existing groupware server to show the Edit Server page and edit the server’s settings.
- If adding a server, enter a Server or Gateway name for easy identification when choosing servers for groups.
- Choose the server type for Google Services from the Server Type drop-down menu: Desktop/SaaS Calendars.
- Choose the calendar type for Google Services in the Calendar Type drop-down menu: Google Apps.
- Select either Use Dedicated Calendar or Use Primary Calendar for the Calendar Choice. If you choose Use Dedicated Calendar, you must then enter the Google Calendar name and pick a Google Calendar Initial Color. The name and color correspond to the name and color of the calendar within Google Calendar that you want to use for your travel information.
- (Optional) You can also enter a Groupware ID in the Groupware ID field. This value is used for testing purposes only.
- Click the Save button to save the server settings.
- To commit these changes, click the green Changes not applied link in the top right corner of the page, and then click the Commit button.
As part of the process, we would like to test users to assure that the Google Apps Connectivity is working correctly. Please email travelcustomersuccess@deem.com with one email addresses that we can test to make sure we are able to connect to the Google Apps calendar correctly.
Assigning the Groupware Rule to a Group
To assign the groupware rule to the group, follow these steps:
- Log into the Partner Dashboard as the site administrator.
- Click the Rules tab, and then click the Groupware Rules link.
- Click the Add button next to the group name (or the Everyone group).
- Enter a Rule Description that describes the intent of this rule, and click the Activate Rule checkbox.
- Scroll down to the “Then” section of the page, and click the “Enable groupware access” checkbox.
- Select the server or gateway name (the name you entered in Step 4 in the previous steps for adding the groupware server) from the Use Groupware Server drop-down menu, and click the “Enable calendar updates on this server” and “Enable address book lookups on this server” checkboxes.
- Click the Save button to save the settings.
- To commit these changes, click the Changes not applied link in the top right corner of the page, and then click the Commit button.