Entering the Car Service Details
In the Car Service section, enter the information in the following fields:
Entering A Pick-up Address
- Click into the Pick-up address field to enter the pick up location:
- You have multiple choices for how to enter their pick-up address

- Address Book Icon: If a user clicks the address book icon, a module will pop up containing all of the locations the user has saved to their personal address book which is located at the profile level.

- Searching by Keywords: If a user has many saved addresses, they can search key words or letters using the search bar which generates a list of addresses based on previously entered information by the user.

- Viewing Company Saved Addresses: Users can also easily view their company's saved addresses by typing in the known nickname or naming convention for company office locations. In this case, users type "GS-" and they will get a list of all of their company's office locations.

- Using the Go to Map Option: Users can also use the "Go to Map" option if they need help visualizing where their pick-up location will be.

- You have multiple choices for how to enter their pick-up address
Entering A Drop-off Address
Click into the Drop-off address field and enter the street address, airport code, location name or select from the list that displays. When entering a drop-off address, users will see an additional option in the dropdown menu called "As Directed" which allows users to book a ride when their drop-off address may be more flexible or unknown at the time they book the ride.
- Drive as directed: When this option is selected, an additional field displays where you select the number of hours the car is needed from the drop down list.


- Adding Stops: Users can also add additional stops between their pick-up and drop-off locations. (2 additional stops is the maximum)


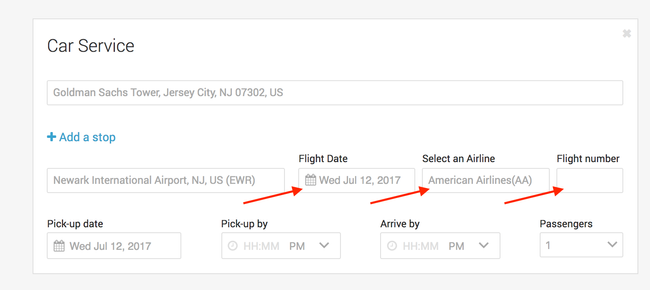
- If an Airport Code is entered:
- Additional fields display where the following information needs to be filled out:
- Flight Date, Select an Airline (optional) and Flight number (optional)
- Flight Date, Select an Airline (optional) and Flight number (optional)
- Additional fields display where the following information needs to be filled out:
- Click in the Pick-up date field and select the date from the calendar.
- Click in the Pick-up by field and enter the desired pickup time in hours and minutes. Select AM or PM by clicking on the carrot next to the time.
- Click in the Passengers field to select the number of passengers from the drop down list.
- Once all the information has been entered, click the Continue button, the Select Car page displays.
Selecting a Vehicle
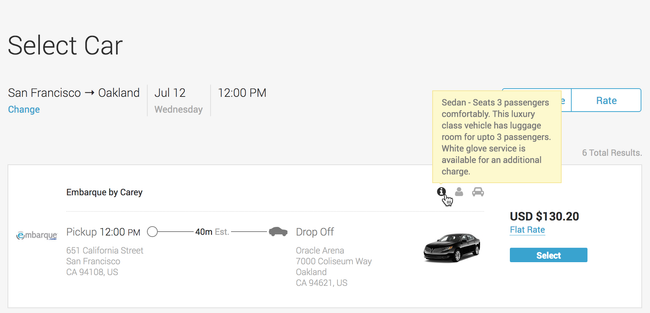
Scroll through the car options that display to view the car details.
- Vehicle Type: Users can refine their search by clicking on the Vehicle Type button (Sedan, SUV, Van) or by clicking on the Rate button. (Rate, Provider, Capacity)


- Users can view the fare breakdown by hovering over the "Flat Rate" or "Hourly" blue link that appears below the price-

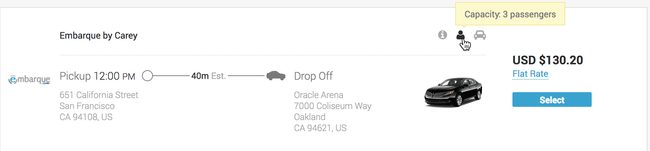
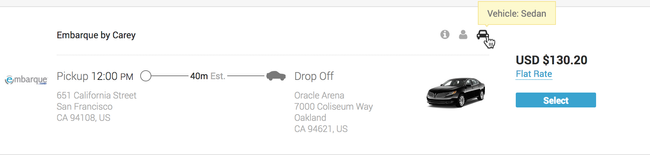
- Hover your pointer over the grayed out icons to display additional information about the vehicle.
- Car Info: This icon displays passenger and luggage information as well as additional options.
- Passenger Capacity: This icon displays how many passengers the car can seat comfortably.
- Vehicle Details: This icon displays the vehicle type.
- Car Info: This icon displays passenger and luggage information as well as additional options.
- Once you have found your car choice, click the Select button.
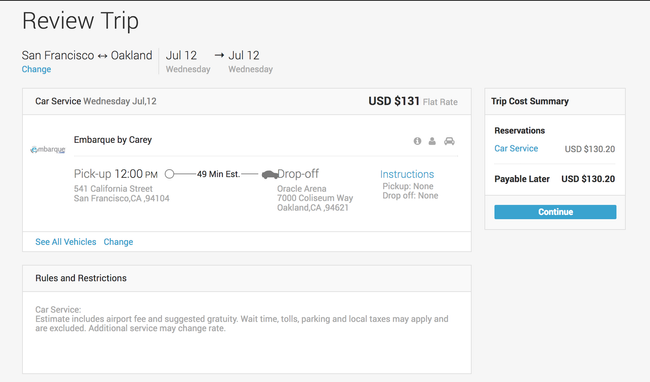
Reviewing the Car Service Selection
On the review page, make sure your selection is accurate, if so, click the Continue button.
If you need to change the selection, click on the Change link to select another car.
Purchasing Car Service
On the Purchase page, review and update the following information: 
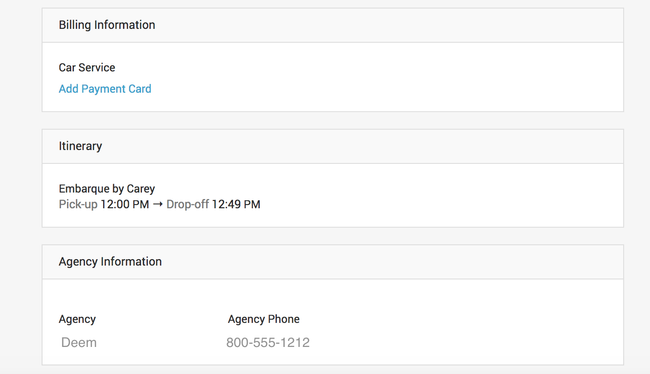
- Name Your Trip: You can enter a name for the car service trip
- Traveler: Review the traveler name, email and phone numbers for accuracy. If changes are needed, click the Edit link to adjust.
- Preference and Rewards Programs: Review the information, if changes / updates needed, click the Edit link to adjust.
- Additional Information: Select a reason for the trip from the drop down list in the Reason for Trip field.
- Billing Information: If there is no payment card, click the Add Payment Card link to add a card. If a card is added to the user's account profile, the card will display with the last four digits of the card visible.
- Once you have reviewed and updated the information as needed, click the Purchase button to purchase the car service.
Please Note: A confirmation email will be sent to the user.
The trip will appear in the Upcoming section of the Home page for the user.