Entering the Car Service Details
In the Car Service section, enter the information in the following fields:
Entering A Pick-up Address
- Click into the Pick-up address field to enter the pick up location:
- You have multiple choices for how to enter their pick-up address

- Address Book Icon: If a user clicks the address book icon, a module will pop up containing all of the locations the user has saved to their personal address book which is located at the profile level.

- Searching by Keywords: If a user has many saved addresses, they can search key words or letters using the search bar which generates a list of addresses based on previously entered information by the user.

- Viewing Company Saved Addresses: Users can also easily view their company's saved addresses by typing in the known nickname or naming convention for company office locations. In this case, users type "GS-" and they will get a list of all of their company's office locations.

- Using the Go to Map Option: Users can also use the "Go to Map" option if they need help visualizing where their pick-up location will be.

- You have multiple choices for how to enter their pick-up address
Entering A Drop-off Address
Click into the Drop-off address field and enter the street address, airport code, location name or select from the list that displays. When entering a drop-off address, users will see an additional option in the dropdown menu called "As Directed" which allows users to book a ride when their drop-off address may be more flexible or unknown at the time they book the ride.
- Drive as directed: When this option is selected, an additional field displays where you select the number of hours the car is needed from the drop down list.


- Adding Stops: Users can also add additional stops between their pick-up and drop-off locations. (2 additional stops is the maximum)


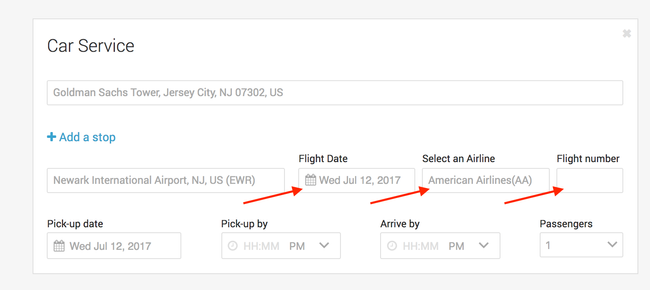
- If an Airport Code is entered:
- Additional fields display where the following information needs to be filled out:
- Flight Date, Select an Airline (optional) and Flight number (optional)
- Flight Date, Select an Airline (optional) and Flight number (optional)
- Additional fields display where the following information needs to be filled out:
- Click in the Pick-up date field and select the date from the calendar.
- Click in the Pick-up by field and enter the desired pickup time in hours and minutes. Select AM or PM by clicking on the carrot next to the time.
- Click in the Passengers field to select the number of passengers from the drop down list.
- Once all the information has been entered, click the Continue button, the Select Car page displays.
Selecting a Vehicle
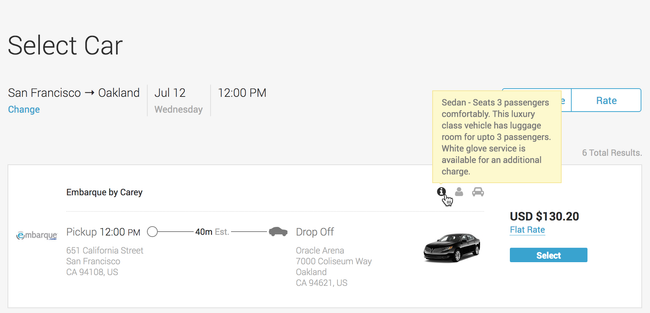
Scroll through the car options that display to view the car details.
- Vehicle Type: Users can refine their search by clicking on the Vehicle Type button (Sedan, SUV, Van) or by clicking on the Rate button. (Rate, Provider, Capacity)


- Users can view the fare breakdown by hovering over the "Flat Rate" or "Hourly" blue link that appears below the price-

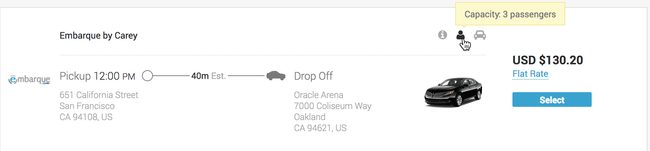
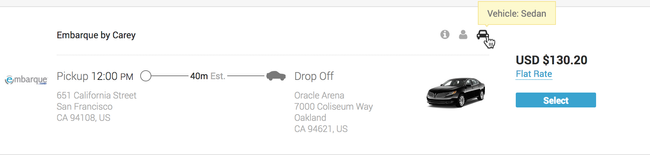
- Hover your pointer over the grayed out icons to display additional information about the vehicle.
- Car Info: This icon displays passenger and luggage information as well as additional options.
- Passenger Capacity: This icon displays how many passengers the car can seat comfortably.
- Vehicle Details: This icon displays the vehicle type.
- Car Info: This icon displays passenger and luggage information as well as additional options.
- Once you have found your car choice, click the Select button.