...
In order to control spending, organizations can configure services such as Travel to allow certain kinds of bookings and disallow others. For example, a company may have a travel policy that allows executives to fly business class, while non-executive employees are allowed only to fly coach or economy class. Groups Groups make it possible for you to assign different rules to different types of users. A user’s access to services and other options is determined by the groups to which the user belongs.
When you set up a service, you can set up rules for using the service, and then apply those rules to different groups within your organization.
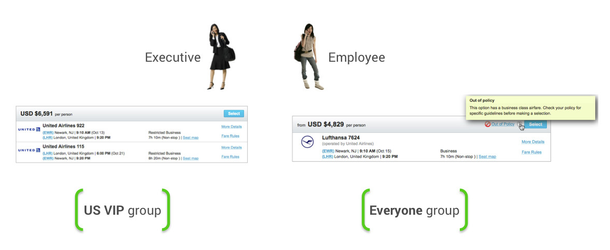
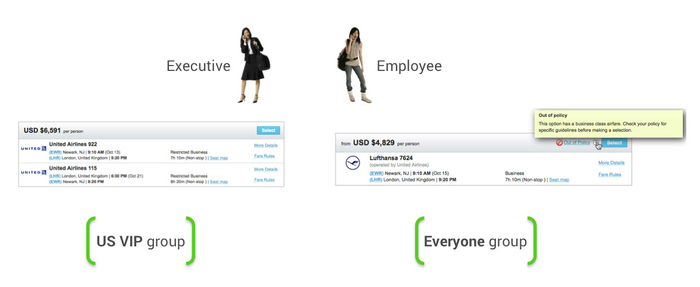
Each user belongs to at least one group called the Everyone group. By default, all users belong to this group. The Everyone group is the default group that applies to all employees of a company. You use it to define a default set of rules for all employees. These rules can be overwritten by rules that are assigned to groups with a higher priority.
...
- Group Name: Enter a name that will be easily recognizable for the group. For example, you might use VIP if your organization is a large enterprise, or the client name if you manage a site with multiple client businesses.
Note: Do not include any special characters in the Group Name. - Description: (Optional) Enter a group description.
- Group Use: Select the type of rules that can be assigned to this group. For example, if service rules should be assigned, click the checkbox for Service Rules. This means that when you assign service rules under the Rules tab (as described in Rules Tab for Managing Rules), this group will appear so that you can assign service rules to it. You can enable the following rules for this group:
- Service Rules: The group will appear in the list of groups for Service Rules under the Rules tab.
- Account Rules: The group will appear in the list of groups for Account Rules.
- Groupware Rules: The group will appear in the list of groups for Groupware Rules.
- Display Options Rules: The group will appear in the list of groups for Display Options Rules.
- Web Services Rules: The group will appear in the list of groups for Web Services Rules.
- Mobile Rules: The group will appear in the list of groups for Mobile Rules.
- Dynamic Profile Attribute Assignment Rules: The group will appear in the list of groups for Dynamic Profile Attribute Assignment Rules.
- Select the group parameters for defining the group:
- Select User or Group from the first dropdown menu under "And..." to add the first parameter.
- If you select Group, choose an existing Group name from the second dropdown menu.
- If you select User, choose a parameter from the second dropdown menu.
- You can choose parameters to match users, such as User Name / Login, First Name, Middle Name, Last Name, Email, Is Guest User, Is a Traveler, and so on.
- If you choose a parameter such as User Name / Login, you can also choose an operator (such as Starts with, Contains, Equals, and so on) from the second dropdown menu, and enter text in a field for the operator. For example, you can choose User, Department Name, Starts with, and Sales (for any department starting with the word "Sales").
- Choose Dynamic Group Name to define a group that is used for meeting travel, and then enter a name that is an exact match for the meeting type in the meeting provider tool. See Managing Meetings on a Site for details.
- Click the Add Parameter link if you need more than one parameter to define the group.
- Select User or Group from the first dropdown menu under "And..." to add the first parameter.
- Click the View Active Users button to be sure the value used as the parameter is correct. A list of users who fit the criteria appears.
- Make sure that the list includes the appropriate users. Click Back to return to the Add Group page. Adjust the parameters if necessary.
- Click Save to save the group.
...
Tip: To reduce the number of profiles that are sent out to global distribution systems (GDSs) to only those users who actually travel and have travel preferences, you can define a group using the Is a Traveler parameter User in Step 4 to include only those users who have travel preferences.
Note: To commit all of your changes after saving them, click the changes not applied link at the top of the page. The Commit Changes page appears. Click the Commit button.
...
To edit an existing group, click the group's name in the Name column. The Edit Group page appears. Follow the steps above to edit the group information.