...
- Enter a full or partial first name, full or partial last name, full or partial user name, email address, or employee ID.
- Optionally refine your search based on:
- Account type: Choose an account type (End User, Support, or All) in the Account Type dropdown menu.
- Manually added users only: Click the "Show only manually added users" checkbox.
- Optionally refine your search by user status by clicking the checkbox for "Show only inactive users", to reset password deselect the checkbox.
- Click Search. The Search Results section appears with a list of names and an Add button for each name:
...
- Click the Add button to select a user for activation. The user appears in the Selected Results section (and the Add button for the user in the Search Results section is grayed out). Repeat this step for each user you want to activate.
Note: You can remove a name from the Selected Results section by clicking the Remove button next to the user. - After selecting all of the users you want to activate, click the Continue button. The Confirmation page appears with the Selected Results section showing the following:
- Status: The status of the user in the system — either Active or Not Active.
- Status In Company: The status of the user within the company — either Active or Not Active.
Note: An Active user will appear in reports; a Not Active user will not appear in reports. - Type: Type of user, such as Support or End User.
Note: An End Userwill appear in reports; a Support user will not appear in reports. - Source: The method by which this user was loaded — either manual load or file upload.
- Select options in the Activate Account section:
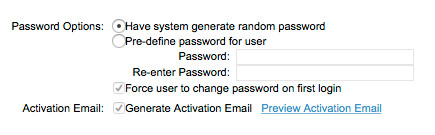
- Click the radio button for one of these Password Options:
- "Have system generate random password": The system will generate an Activation email and require the password be changed by the user upon first log in.
- "Pre-define password for user": Select this option to pre-define a password. Enter and confirm entry of the password.
- Click the checkbox for the "Force user to change password on first login" option. This is automatically selected if you choose the system-generated password option.
- Activation Email: Click the checkbox for the "Generate Activation email" option to generate the activation email.
- Click the Preview Activation Email link to preview the completed activation email. Enter the email address to receive the activation email preview when prompted.
- Click the radio button for one of these Password Options:
- Click the Activate Now button to send the email and activate the user.